
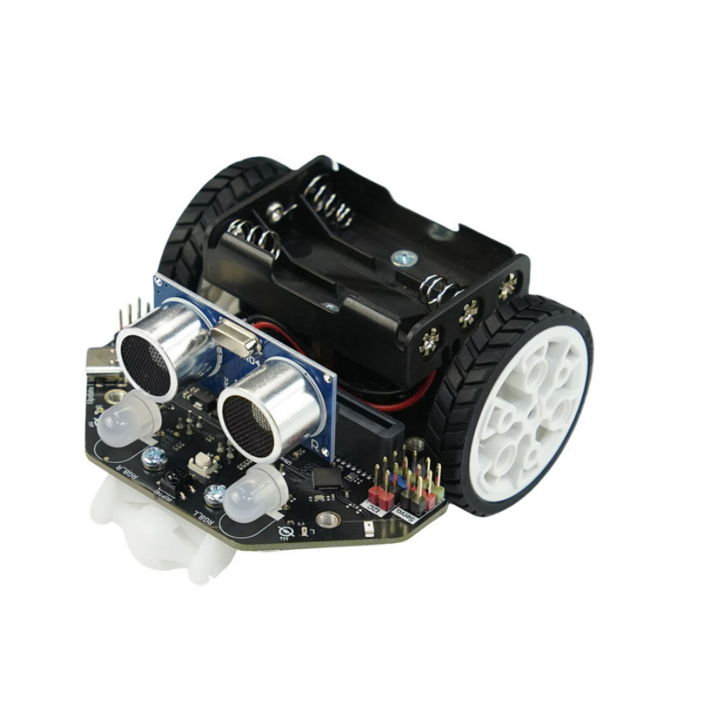
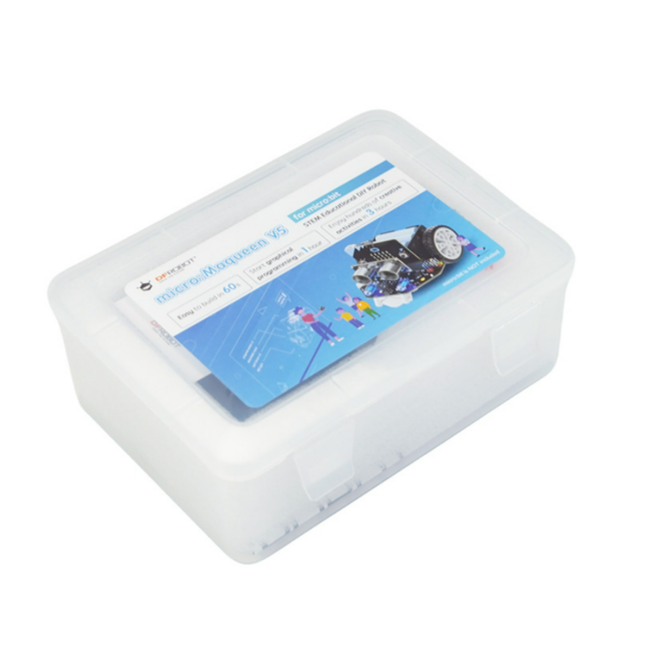
Maqueen Lite V5 micro:bit Robot Kit for STEM (Line Tracking & Obstacle Avoidance) - แท้จาก DFRobot
| รหัสสินค้า | RU50039 |
| หมวดหมู่ | Learning Kits / Smart Car Kits |
| ราคา | 2,185.00 บาท |
| สถานะสินค้า | พร้อมส่ง |
| จำนวน | ชิ้น |

รายละเอียดสินค้า
ดูรายละเอียดการใช้งานได้ที่ Click
หมายเหตุ: สินค้าไม่รวม บอร์ด micro:bit
Applications
-
STEM Education
-
Robotics competition
-
Voltage: 3.5V - 5V DC
-
Batteries: 3x AA (1.5V Alkaline or 1.2V Ni-MH)
-
Reverse Connection Protection: Supported
-
Sensors: 3
-
Calibration Button: 1 (Shared with Firmware Upgrade)
-
Sensor Output: Switch / Analog
-
On-chip Line-Following Function: Supported
-
On-chip Line-Following Speed: 1 preset
-
Programmable RGB LEDs (WS2812): 4 (Full R255 x G255 x B255 color spectrum)
-
RGB Headlights: 2 (Red, Green, Yellow, Blue, Purple, Cyan, White)
-
Quantity: 2
-
Data Range: 0 - 1023
-
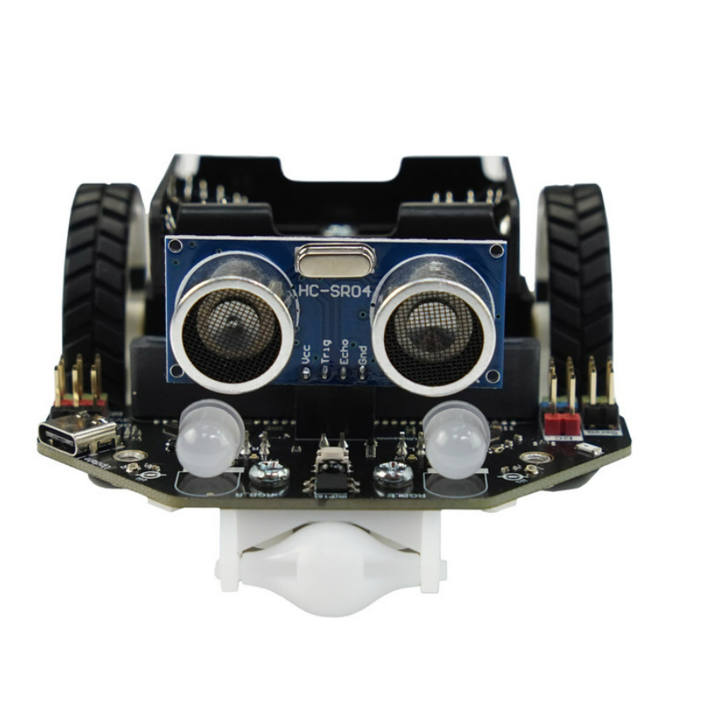
Model: HC-SR04 (Note: Document says H-SR04, HC-SR04 is far more common and recognizable)
-
Quantity: 1
-
Supply Voltage: 5V
-
Interface: IO Port (2.54mm Female Header)
-
Range (Mounted): 5cm - 50cm
-
Range (Unmounted): 5cm - 300cm
-
Accuracy: ±5cm
-
Quantity: 2
-
Type: N20 Metal Motor
-
Interface: 2.54mm Pin Headers
-
Power: Direct from battery
-
Mounting: Screw-fixed, detachable
-
Infrared Receiver: 1
-
Buzzer with Switch: 1
-
Threaded Mounting Points (PCB): 6
-
Firmware Upgrade Interface: 1 (Shared with Calibration Button)
-
Expansion GPIO Pins: 3
-
Expansion I2C Interfaces: 2
-
Servo Motor Ports: 2
-
Edge Connectors (Gold Fingers for micro:bit): Standard micro:bit compatibility (Implicitly 6 significant ones mentioned, but typically refers to the full edge connector)
-
Maqueen Lite V5 STEM Robot ×1
-
Line-tracking map ×1
-
Ultrasonic sensor ×1
5. Preparation Work
5.1 Plug in the micro:bit mainboard
Be careful not to insert it in the wrong direction, as shown in the figure.

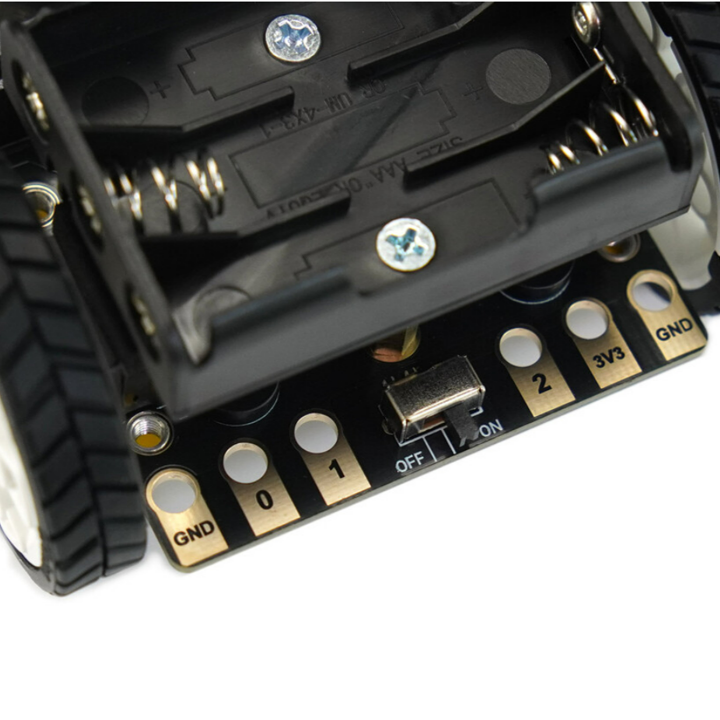
5.2 Install the battery
Pay attention to the installation direction of the positive and negative electrodes of the battery.
Incorrect installation will prevent normal operation and even damage the device or cause danger.

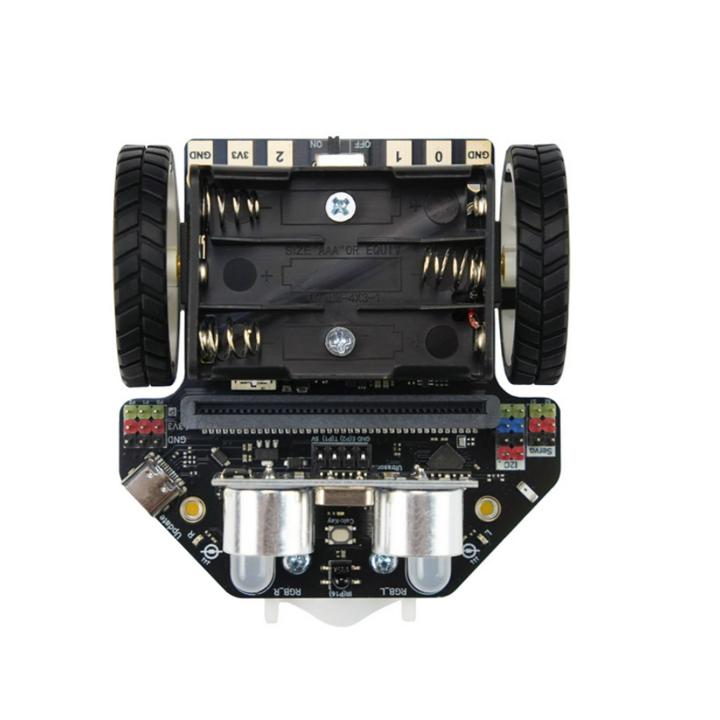
5.3 Turn on the power switch
Move the power switch to the "ON" side to turn on the power switch. At this time, the power indicator light will light up.

6. MakeCode Sample Tutorial
6.1 Open the MakeCode platform and load the library
Click the link to enter the MakeCode graphical programming platform: https://makecode.microbit.org/
Click "New Project" to create a new project, as shown in the figure:
图片
In the pop-up dialog box, give a name to the project, and then click "Create" as shown in the figure:

Load the Maqueen library:
Click the "Settings icon" and then click "Extensions", as shown in the figure:
图片
In the search box, enter dfrobot, and then click the search button. Select "Maqueen", as shown in the following picture:


The library loading is completed. The loaded library is shown as follows:

6.2 RGB Car Light
Function Description
Maqueen V5 has two large-sized colorful front headlights. It can display 7 colors. And it also has the flashing function and the gradient function.

Example 1: Light up the car headlights
This example demonstrates that the two headlights are displayed in red for one second, then turned off for one second. This cycle repeats.

Example 2: Change the color of the car headlights
This example demonstrates that the colors of the two headlights are switched at intervals of one second.

Example 3: Background flashing of the car headlights
Maqueen V5 supports the background flashing of the headlights, which is a characteristic function of Maqueen. Just send one instruction, and it can flash cyclically. The number of flashes, the flashing frequency and the flashing color can be set. And it can be interrupted in real time to turn off the headlights.
This function enables the headlights to flash cyclically without affecting other program processes.
Note: This function is mainly used in "on start". When used in "forever", the effect may not be good due to timing reasons.

Example 4: Background Gradient of the Car Headlights
Maqueen V5 supports the gradual display of colorful lights for the headlights in the background. It is a characteristic function of Maqueen. Just send one instruction, and the headlights can gradually display different colors.
This function enables the headlights to change colors when lit without affecting other program processes.
Note: This function is mainly used in "on start". When used in "forever", the effect may not be good due to timing reasons.

6.3 WS2812 RGB Ambient Light

Function Description
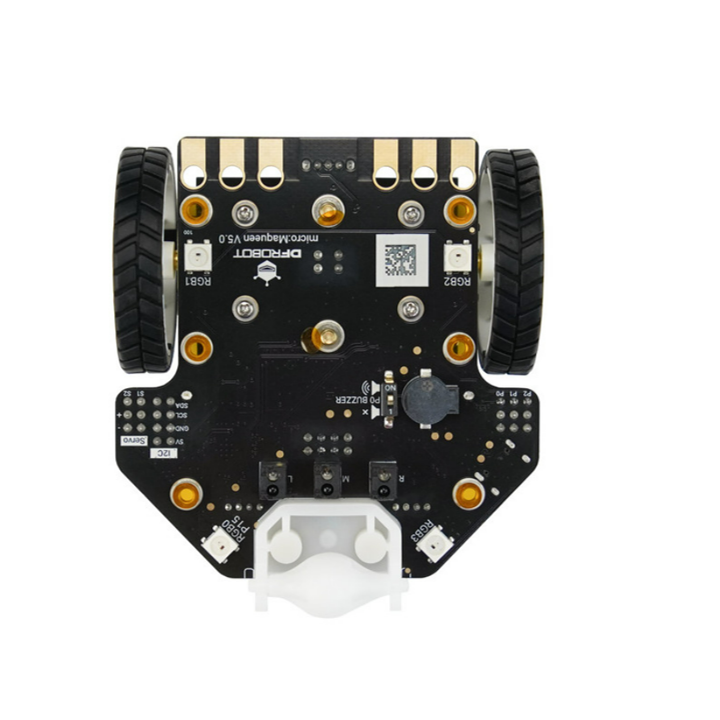
Maqueen V5 has 4 WS2812 RGB ambient lights onboard at the bottom. They are connected to the P15 interface of micro:bit. These 4 ambient lights support full-color display.
To use the ambient lights, you first need to load the "neopixel" library in makecode. The method is shown as follows:
Click the Extensions button:

Search for "neopixel", and then select "neopixel", as shown in the figure:

Example 1: Light up the ambient lights
This example shows the switching display of nine colors for the ambient lights.

Example 2: Breathing Light Color Fusion
This example demonstrates the gradual fusion effect of the breathing state of the ambient lights by setting the RGB color values.
Example Link: https://makecode.microbit.org/_Ao1L5tUXaEkj

Example 3: Rotating Flowing Water Lights
This example demonstrates the effect that the ambient lights present the flowing water lights lighting up one by one.

Example 4: Rotating Rainbow Lights
This example demonstrates that the ambient lights display a gradual rainbow color and present a dynamic switching effect.
Among them, the hue of the rainbow color can be adjustable within the range from 1 to 360, and different color effects will be presented.

6.4 Buzzer

Function Description
Maqueen V5 integrates a buzzer and a switch, which are located at the bottom of the car. By driving the buzzer, the car can emit alarm sounds or various kinds of music.
The Microbit V2 mainboard integrates a buzzer, while the Microbit V1 mainboard does not integrate a buzzer. If you are using Microbit V1, then you can use the buzzer on the car's baseplate. If you are using V2, then you can freely choose whether to use the buzzer integrated in the Microbit or the buzzer of the car.
The buzzer of Maqueen V5 is connected to the P0 port of the microbit. If you want to use the P0 port, the buzzer switch needs to be in the off state.
Example 1: Play Music

6.5 Maqueen V5 go!
Example 1: Maqueen V5 go!
Program Description:
- Maqueen moves forward at a speed of 100. Also, it continuously plays music, and the car lights change color at a frequency of one second. The car lights are configured as RGB lights and can display seven colors.
- The speed range for moving forward is 0 - 255, not 0 - 100. This is also the range of the PWM pulse width.
- If the speed is within 30, the car may not move. Please set the speed to above 30. The reason is that the motor is driven by PWM. When the speed is low, the driving force will be insufficient. So when the speed is below 30, the driving force is too weak, resulting in the car hardly moving.

Example 2: Swing Car
Program Description:
- In this example, motor drive, car lights, and bottom RGB lights will be used.
- The bottom RGB lights will be lit in rainbow colors. The bottom RGB lights of Maqueen V5 are set at the P15 pin. The display range of rainbow colors is from 1 to 360. You can try adjusting the values to observe the color changes.
- The car will turn right for a while and then turn left for a while. The car lights on the left and right sides will also switch to different colors as well.

6.6 Quick Start for Line Tracing
Function Description
The quick line tracing function is a characteristic feature of Maqueen V5. It implements the line tracing function on the underlying chip. Students can use the line tracing function with just one "black", significantly lowering the entry threshold for students.
Example 1: Quick Line Tracing
Program Description:
- Quickly enable the line tracing function.
- After downloading the program and placing the car on the accompanying map, the car will automatically follow the black line to travel, as shown in the figure:


6.7 Ultrasonic Obstacle Avoidance
Function Description
On Maqueen V5, an ultrasonic sensor can be supported for installation. Through the detection of the distance of obstacles by ultrasonic waves, the function of automatic obstacle avoidance of the car can be realized.
Example 1: Ultrasonic Obstacle Avoidance
Insert the ultrasonic sensor into the ultrasonic interface at the front of the car. Both the front and rear rows of interfaces can be used, and there is no functional difference, as shown in the figure:

The situation when the ultrasonic sensor is inserted properly is shown in the figure:

After downloading the program, the car will automatically detect whether there are obstacles in the front. If so, it will automatically turn to avoid the obstacles.

Example 2: Assembly Line Robot
Function Description:
Place obstacles on the map as shown in the following figure.
After the program is downloaded, place the car on the black line. The car will travel along the black line. When encountering an obstacle in the front, the car will turn around and then continue to trace the line. This repeats all the time.
If the battery power is different and when the turning angle and speed are not appropriate, the speed of the motor and the pause time can be adjusted to improve the effect.
Note: If the detection distance of 10 cm in the program is too short and causes a collision, the distance value can be appropriately increased, such as 15cm-20 cm.

[图片]
6.8 Conventional Line Tracing Program
Function Description
Maqueen V5 is onboard with 3 line tracing sensors. When the black line is detected, the output state value is 1. When the black line is not detected, the output state is 0. Utilizing the sensitivity of the sensors to the black line, it is used for line tracing travel.
Meanwhile, the analog quantities of the 3 line tracing sensors can also be read.
Example 1: Line Tracing Robot
Program Description:
Realize the logic of line tracing by reading the states of the 3 line tracing sensors.
Program Link: https://makecode.microbit.org/_7WzMXpWXv7th

Example 2: Read the Analog Quantities of the Line Tracing Sensor
Program Description:
The function of the analog quantity value can be used to read different gray values on the map, and it is possible to judge whether the map material is suitable for line tracing through the ADC value.
This program demonstrates placing the car on a white background and a black background respectively, and checking the difference in gray values between the two.
Read the value of the analog quantity of the line tracing sensor and display it on the computer.

Data Results:
It can be seen from the data that on the black background, the gray value is about 2250, and on the white background, the gray value is about 3000. The numerical difference is about more than 700. Through the difference in values, it is possible to determine whether the car is currently on the white background or the black background, thereby realizing the function of line tracing.
You can also try to read the gray values on different backgrounds to see what kind of gray characteristics and differences there are between them. At the same time, it is also possible to judge whether the map material is suitable for line tracing through the ADC value.


6.9 Application of Light Sensor - Light-Avoiding and Light-Chasing Robots
Function Description
Maqueen V5 has a light sensor built in on each of the left and right sides at the front. This sensor can detect the intensity of light. By the difference in the intensity of light on both sides, the car can avoid the light or travel in the direction of the light.
The positions of the light sensors are shown as follows:

Example 1: The Robot That Avoids Light
Program Description:
- This example demonstrates that if there is strong light on one side during the driving process of the car, it will turn to avoid the light and drive.
- In actual tests, the flashlight function of the mobile phone can be used to shine on the light sensor to verify the program effect.
Program Link: https://makecode.microbit.org/_4FtRXhemt0Af

Example 2: The Robot That Tracks Light
Program Description:
- This example demonstrates that if there is strong light on one side during the driving process of the car, it will follow the direction of the stronger light to drive.
- In actual tests, the flashlight function of the mobile phone can be used to shine on the light sensor to verify the program effect.

6.10 Infrared Remote Control (The infrared remote controller is not configured by default)
Function Description:
Maqueen V5 has a built-in infrared receiving sensor, located in the center of the front of the car, which can receive the transmission signal from the infrared remote controller. By identifying the values of different buttons on the infrared remote controller, the car can perform different actions and be used for functions such as remote-controlling the robot.
Maqueen V5 does not come with an infrared remote controller by default. If you need to use this function, please contact the sales staff to purchase it separately. Moreover, the key values of infrared remote controllers in different batches may be different. Please be aware.

The following table shows the buttons of the infrared remote controller and the corresponding key values for your reference:

Example 1: Read the key value of the infrared remote controller
Program Description:
This example demonstrates displaying the received key value of the infrared remote controller on the serial monitor. The key value is displayed in decimal.

The example effect is as shown in the following figure:

Example 2: Infrared remote control car
Program Description:
- This program demonstrates controlling the car to move forward, backward, turn left, turn right, and stop using an infrared remote controller.
- Press the "2" key on the remote controller, the car moves forward; the "8" key for backward; the "4" key for left turn; the "6" key for right turn; and the "5" key for stop.
Program link: https://makecode.microbit.org/_cfkH1b0xgfkE

7. Calibration of the line-tracking sensor
The line-tracking sensor has been calibrated before leaving the factory. Usually, you don't need to calibrate it. If it is found that the line-tracking sensor cannot correctly recognize the black lines, you can try to calibrate the line tracking.
Before calibration, the microbit mainboard and the ultrasonic sensor need to be removed.
7.1 Place Maqueen on the black calibration area.
Make sure that all three probes are in the black area.

7.2 Press and hold the "Calc-Key" button for about 2 seconds. The line-tracking indicator light flashes twice. Then release the button and the calibration is completed.

7.3 Test the calibration result
Place the line-tracking sensor on the white background and the line-tracking indicator light goes off.

Place it on the black background and the line-tracking indicator light is on. The calibration is correct.

At this point, the calibration is completed.
Note: The line-tracking sensor uses the grayscale detection method to identify the black lines. Therefore, not all black lines can be effectively identified, and even calibration cannot ensure correct identification. For example, the map printed by the printer may not be identifiable.
8. Motor replacement method
Maqueen V5 adopts a design with replaceable motors. If the motor is damaged due to high-intensity use or being dropped, it can be replaced in the following way.
8.1 Remove the motor
8.1.1 Remove the two screws on the battery box

8.1.2 Unplug the power connection cable of the battery box

8.1.3 Remove the 4 motor fixing screws

8.1.4 Take out the motor and the buckle upwards

8.1.5 Take out the motor buckle in an inclined way

At this point, the motor disassembly is completed.
8.2 Install the motor
8.2.1 Insert the motor buckle in an inclined way to avoid the PCB solder joints

8.2.2 Press down gently to complete the installation of the buckle

8.2.3 Insert the motor with the buckle installed downwards into the motor interface

8.2.4 Screw on the 4 fixing screws on the back of the PCB

8.2.5 Plug in the connection cable of the battery box

8.2.6 Fix the 2 screws of the battery box
Note: The power cord of the battery box needs to be placed on the left side of the car to avoid the influence between the power cord and the wheels, as shown in the figure in the previous step.

8.2.7 Install the wheels
Note that the notch of the wheel needs to be aligned with the notch position of the motor shaft. Otherwise, it may not be installed correctly, or the wheel or the motor may be damaged.

At this point, the motor installation is completed.
วิธีการชำระเงิน
ชำระเงินค่าสินค้าโดยการโอนเงินเข้าบัญชีธนาคาร KBANK, SCB, BBL,TMB
กรุณาเก็บหลักฐานการโอนเงินของท่านไว้เพื่อแจ้งการชำระเงินด้วยค่ะ
ท่านสามารถแจ้งการชำระเงินผ่านระบบอัตโนมัติได้โดย Click Link ข้างล่างค่ะ
https://www.arduitronics.com/informpayment
ชำระเงินผ่านธนาคาร


@rfm0967y
ติดต่อสอบถาม
Join เป็นสมาชิกร้านค้า
MEMBER
