
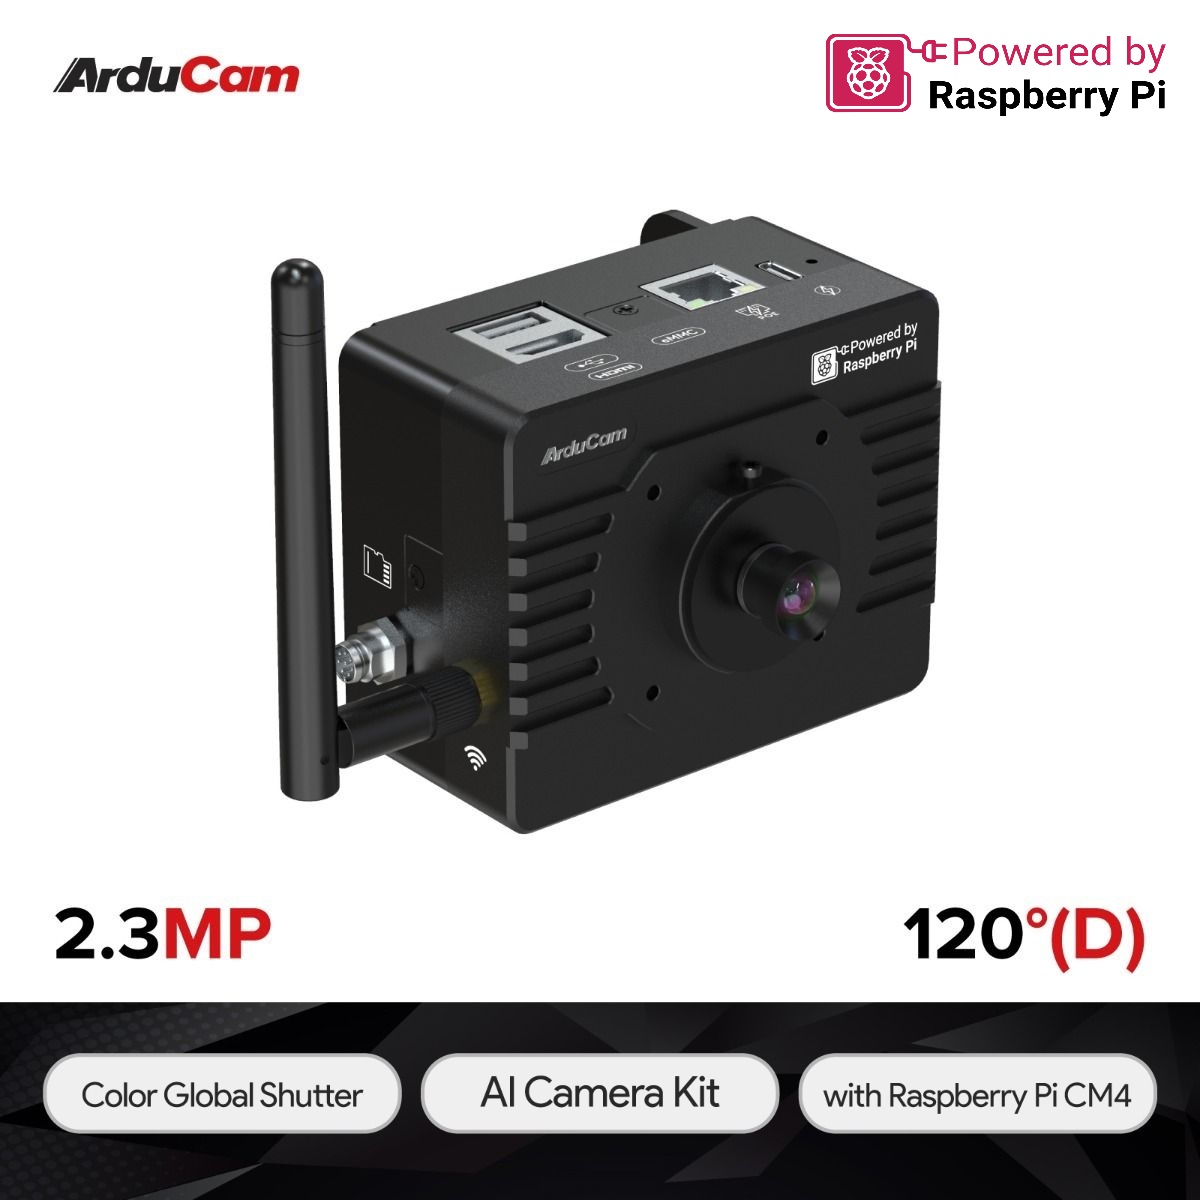
Arducam KingKong, All-in-one Raspberry Pi CM4 AI Camera Kit


| รหัสสินค้า | SG00651 |
| หมวดหมู่ | โมดูลวัดสี กล้องและการมองเห็น Camera / Color / Vision |
| ราคา | 17,500.00 บาท |
| สถานะสินค้า | พร้อมส่ง |
| จำนวน | ชิ้น |

รายละเอียดสินค้า
- Authorised by Raspberry Pi and awarded Powered by Raspberry Pi logo.
- Smart AI Camera Kit: Raspberry Pi CM4, OAK SOM BW1099, AR0234 camera for seamless AI.
- Global Shutter Precision: AR0234 color global shutter camera with M12 Lens.
- Plug & Play Ease: Ready-to-use kit with pre-installed software and demos.
- Versatile Connectivity: HDMI, GPIO, USB, Wi-Fi/PoE options for flexible access.
- Efficient Heat Dissipation: CNC enclosure ensures optimal performance.
Application:
- Face Recognition
- Fatigue Detection
- Object Recognition
- Anomaly Detection
- Hand Tracker
- Pose Estimation Example
- Powerful AI Integration: Arducam AI Camera Kit combines Raspberry Pi CM4 and OAK SOM BW1099 for seamless AI processing, unlocking advanced vision applications.
- Global Shutter Precision: Equipped with AR0234 color global shutter camera, offering distortion-free imaging with M12 Lens and external trigger support.
- PPre-Installed Software: Arducam KingKong comes equipped with a comprehensive suite of pre-installed software, including OpenCV, TensorFlow, Web UI, RTSP Streaming. This software arsenal enhances versatility and empowers users with a range of tools for various imaging and AI tasks.
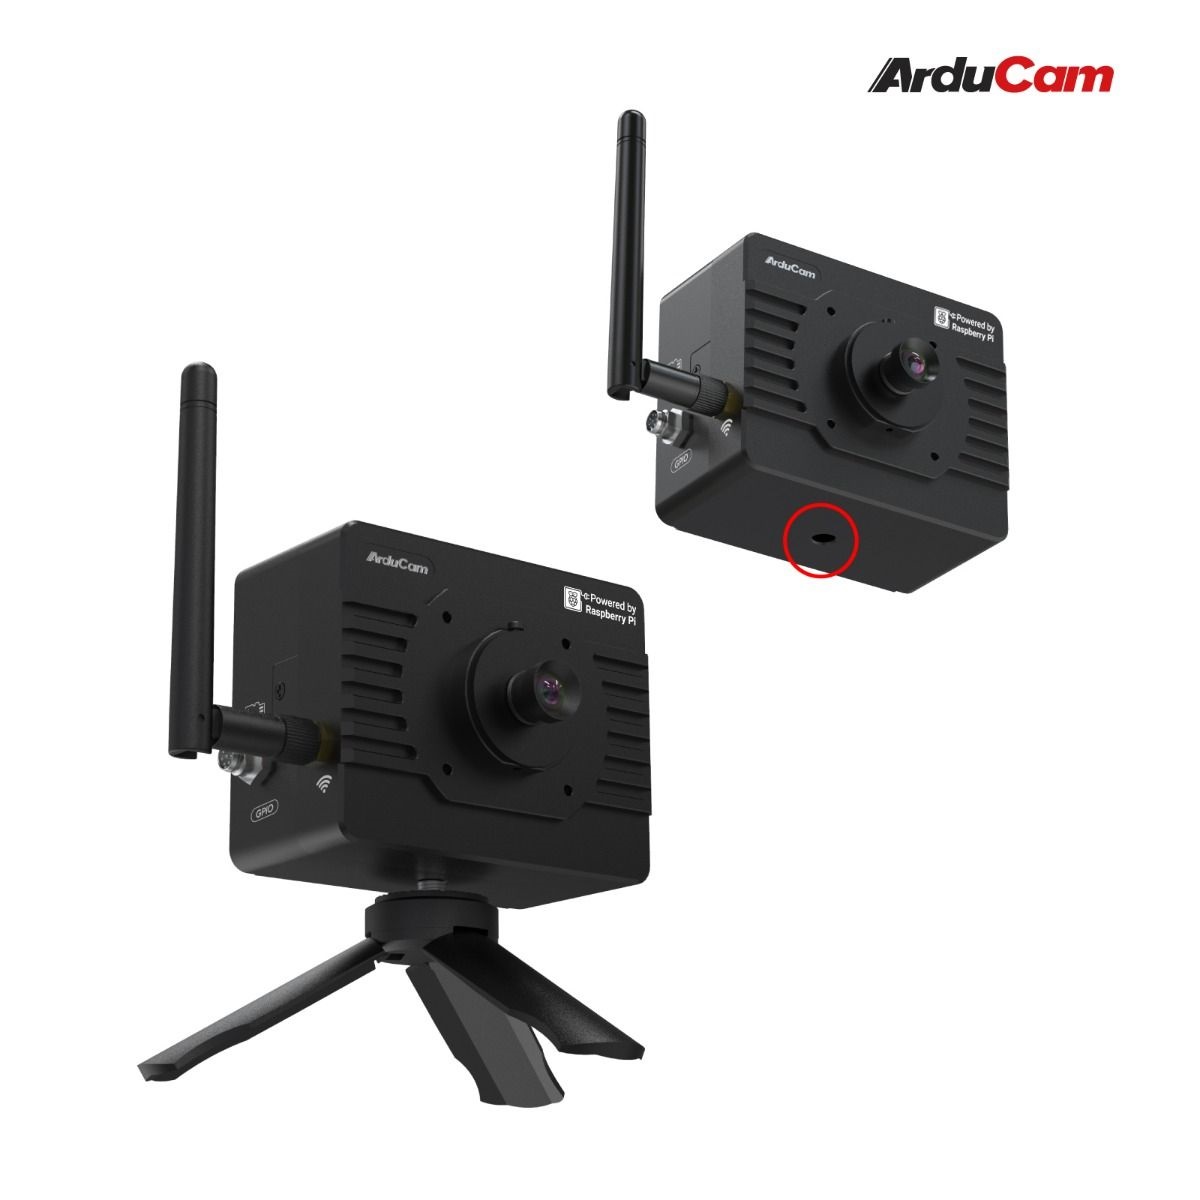
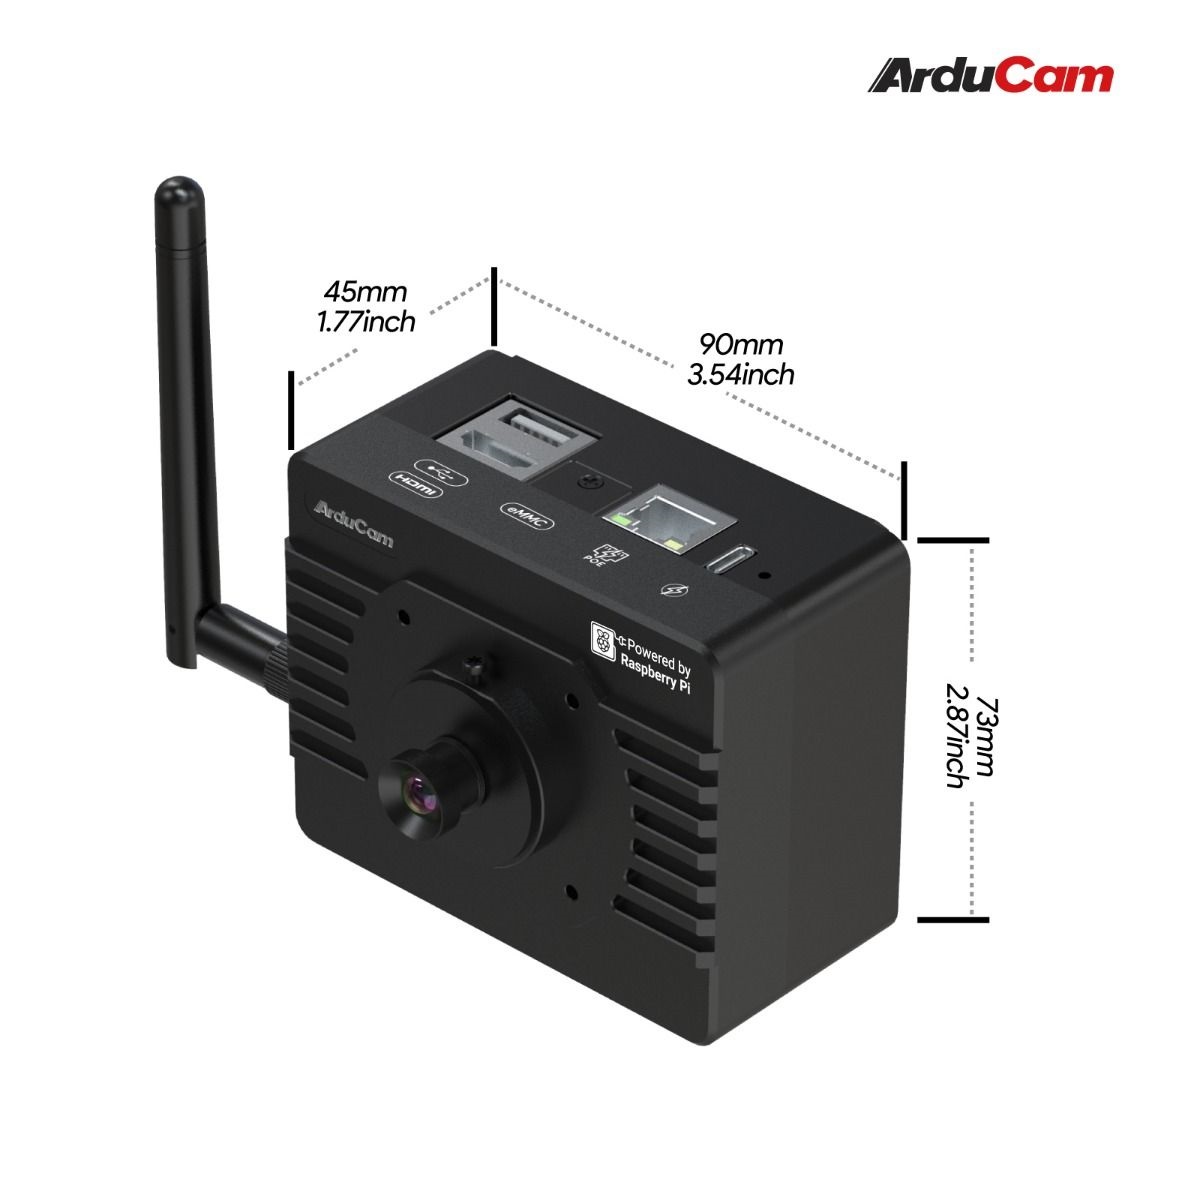
- Efficient Heat Dissipation: Exclusive metal enclosure efficiently merges core module and camera, ensuring optimal heat dissipation for sustained performance.
- Versatile Connectivity: HDMI, GPIO, USB ports, and included antenna provide easy access to Raspberry Pi hardware functions, along with Wi-Fi/Power-over-Ethernet connectivity options.
Package Includes:
- 1× Arducam Raspberry Pi CM4 Camera Kit
Documentation:
Quick Start Guide
Notes Before Starting:
- The built-in SD card of this product already contains all the required environments.
Equipment you may need:
Host: laptop or desktop with Ethernet interface.
Optional: Monitor, HDMI cable, mouse, keyboard, USB Hub
Help Center
There are two options you can choose to access Arducam KingKong. Connect KingKong to the host via an Ethernet cable or connect KingKong to the router via an Ethernet cable:
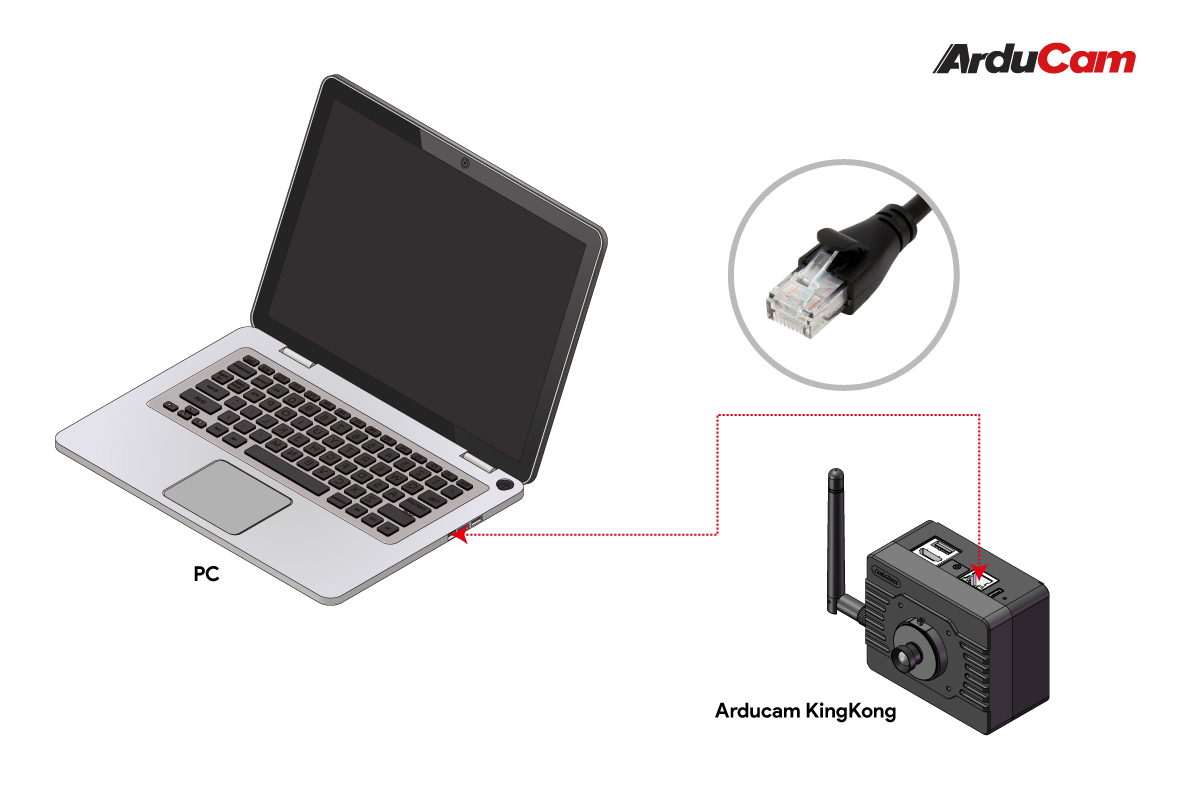
Option1: Connect the host with Ethernet Cable
Option2: Connect the router with Ethernet Cable
Option 1. Connect the host with Ethernet Cable
Hardware Connection
- Step1.
Connect the power supply and Ethernet cable to Kingkong

- Step2.
Connect the Ethernet cable to Host
Software Operation
The KingKong Ethernet interface owns a fixed IP address by default. (10.254.10.1)
- Step1. Find the Device IP address:
After connecting the host and KingKong using a network cable, open the host network settings:
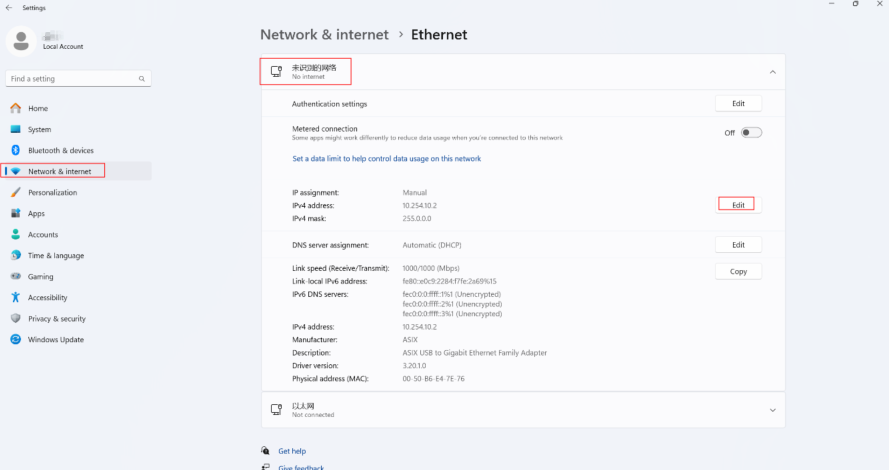
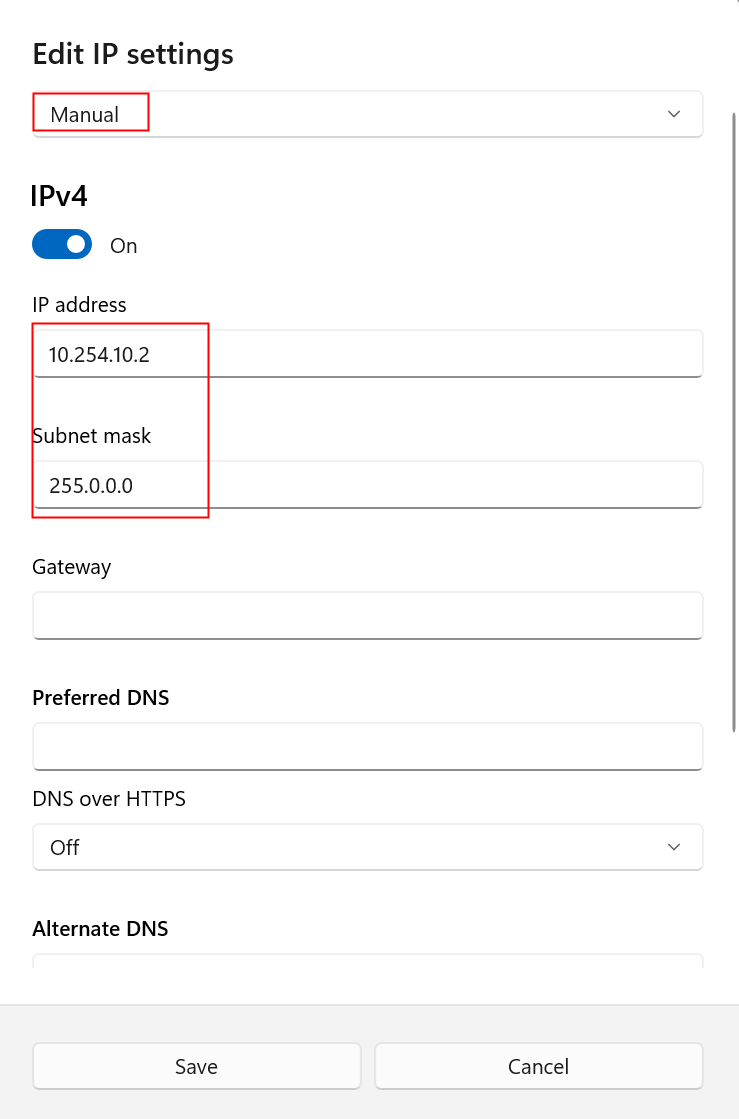
- Step2. Set the host ipv4 to the following format:
- Step3. Open a web page on the host and input
http://10.254.10.1:8081to enter the main network service interface.
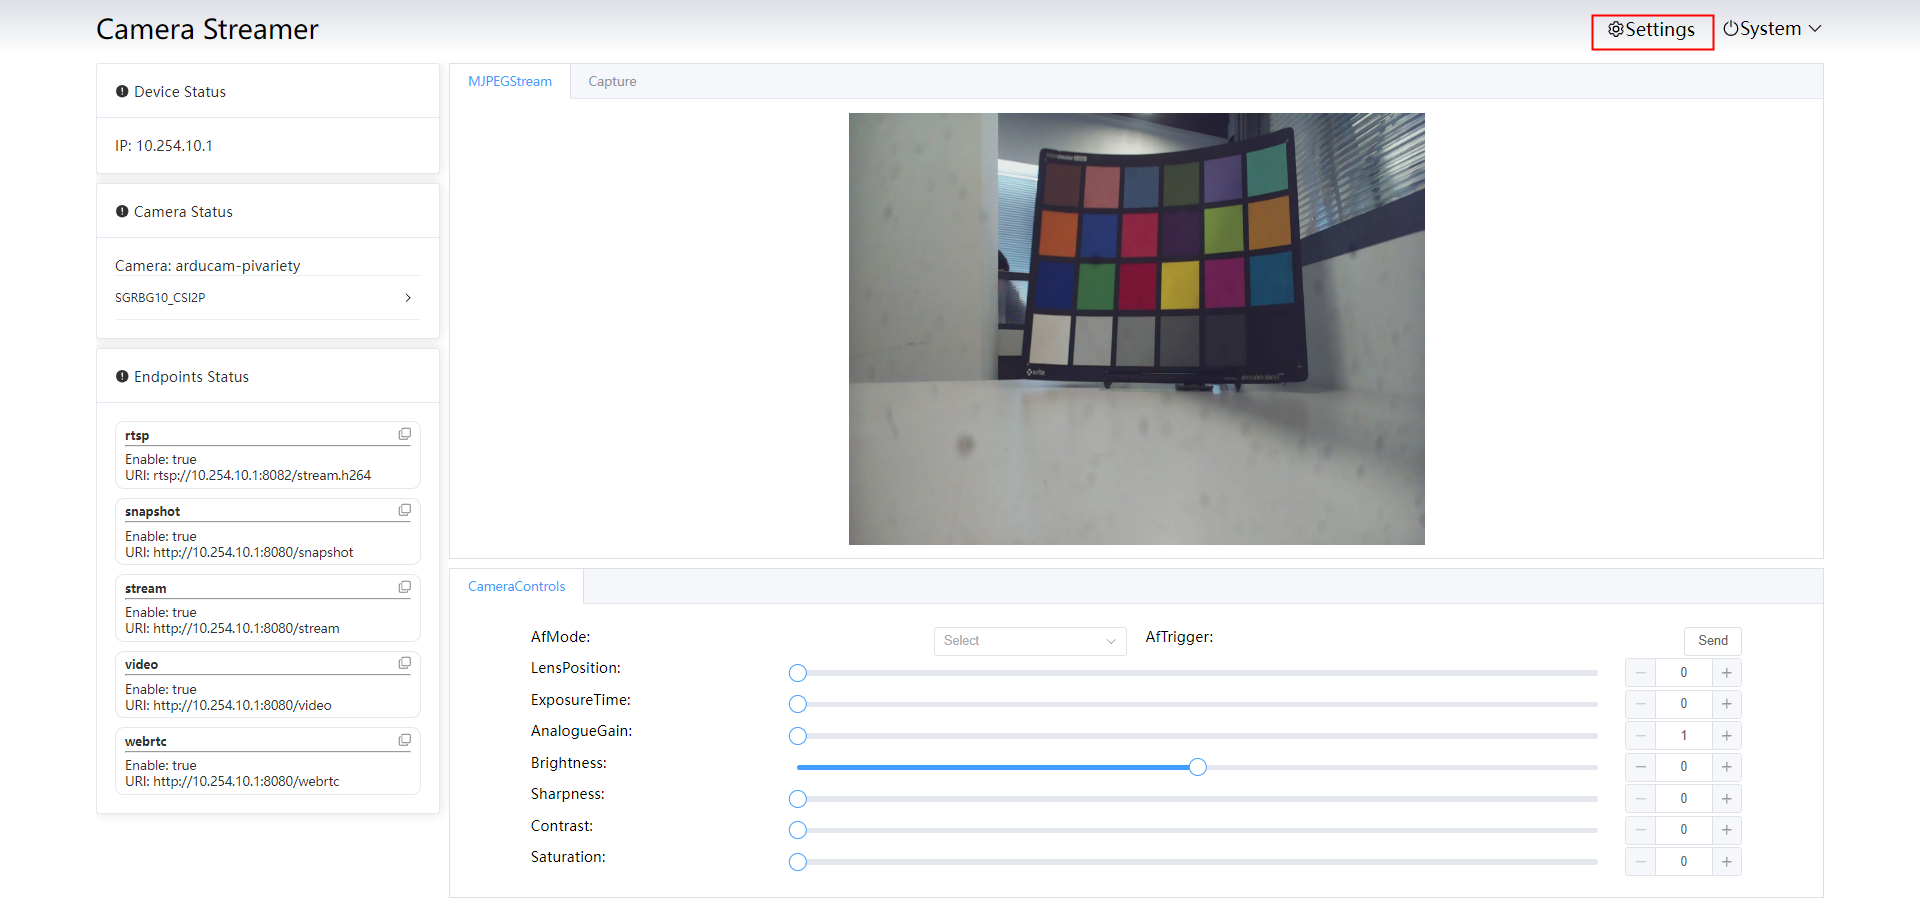
Homepage
Network service page:
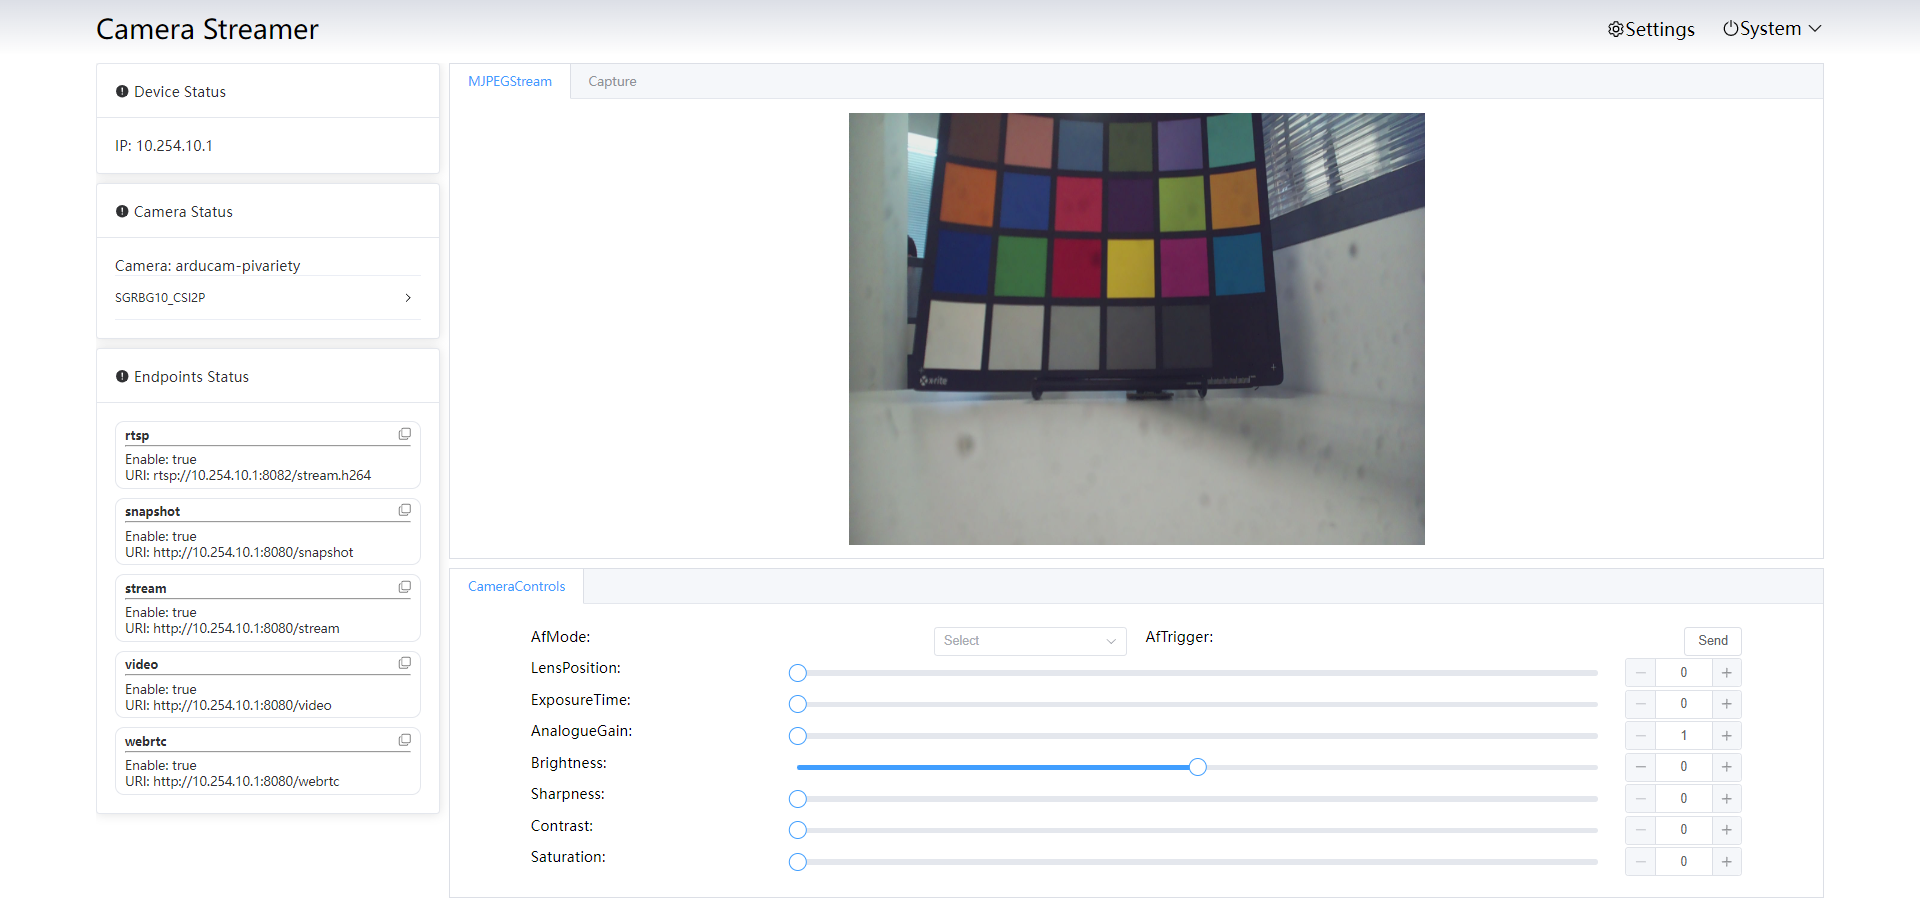
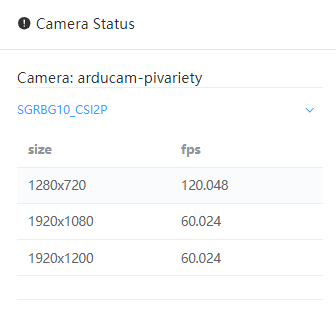
Display the camera status, including format, resolution, frame rate,etc.:
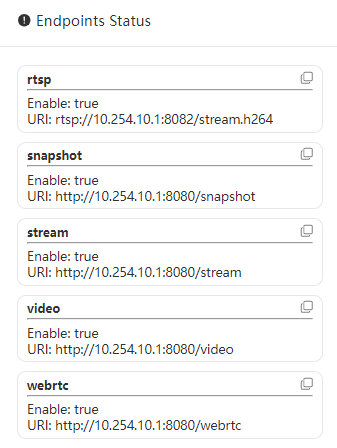
Displays the endpoint status, which only exists when using the camera-streamer service and can be accessed directly through the displayed link.
Tip
The modes contains push streaming modes of various protocols.
Among them, rstp needs streaming software, such as vlc. The rest can be used in web pages.
Settings
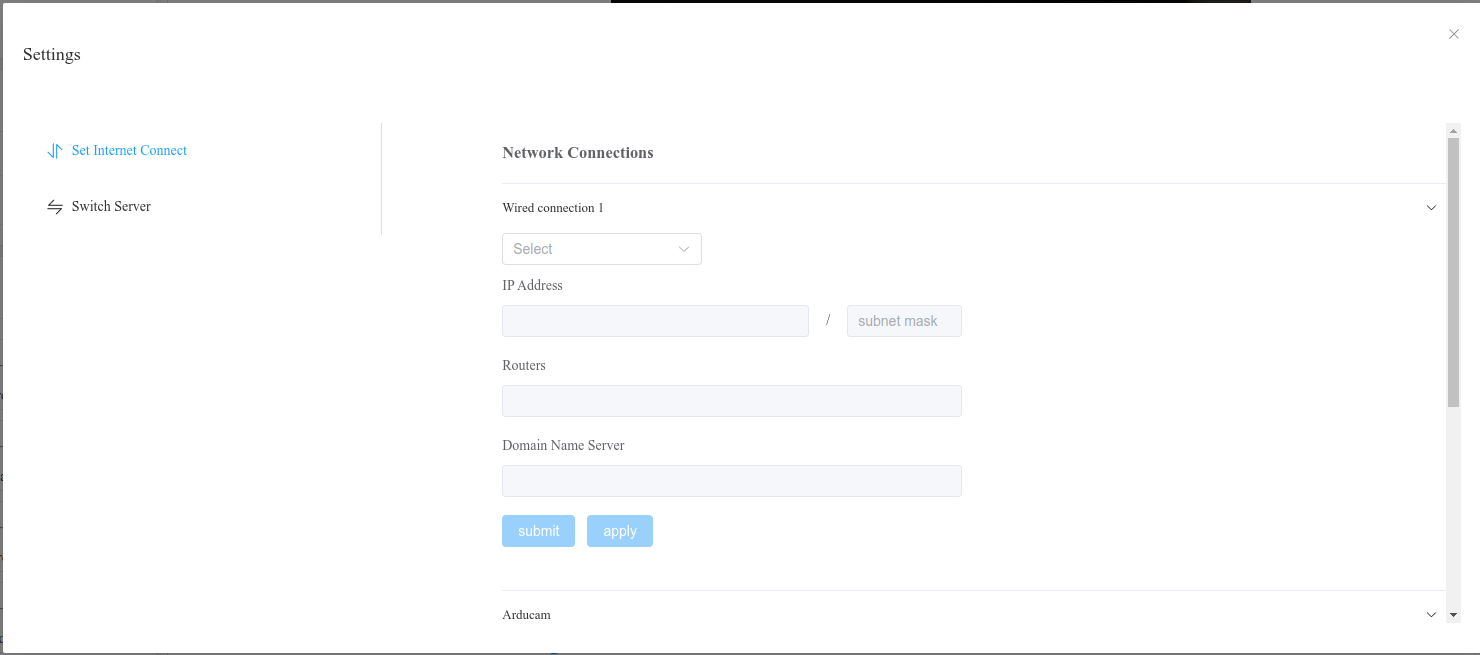
Network Setting:
List all network ports. You can switch between static IP and dynamic IP for a single network port.
For example: switch the current IP address to a static or dynamic address:
Toggle and switch service plugins:
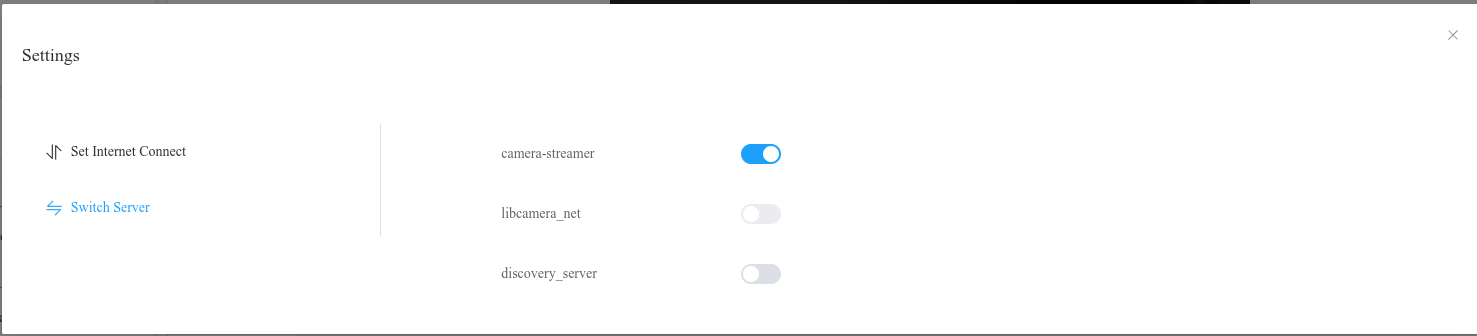
1. libcamera-net
Based on the http push service implemented by libcamera, you can choose different post-processing methods and push the processed images to the front-end page for preview.
2. discovery_server
Used to discover other devices and control all devices to take photos.
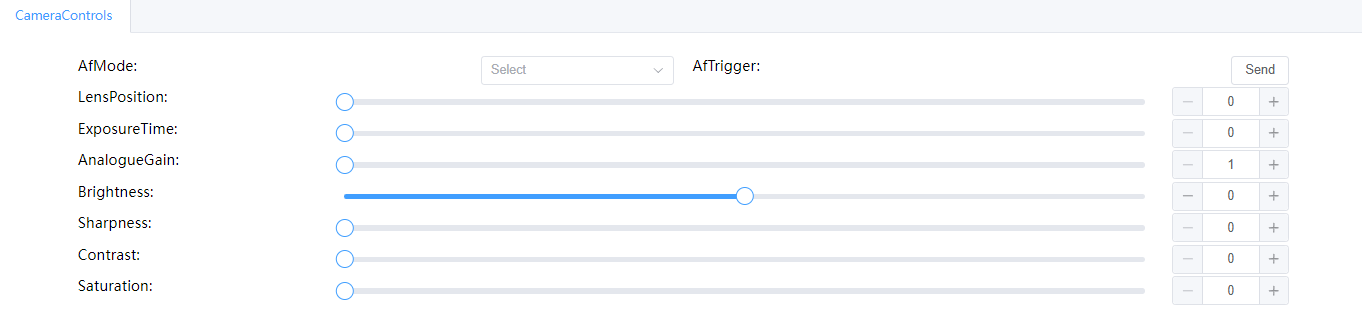
Note
AfMode control does not have camera support. The remaining functions can be controlled by sliding the slider.
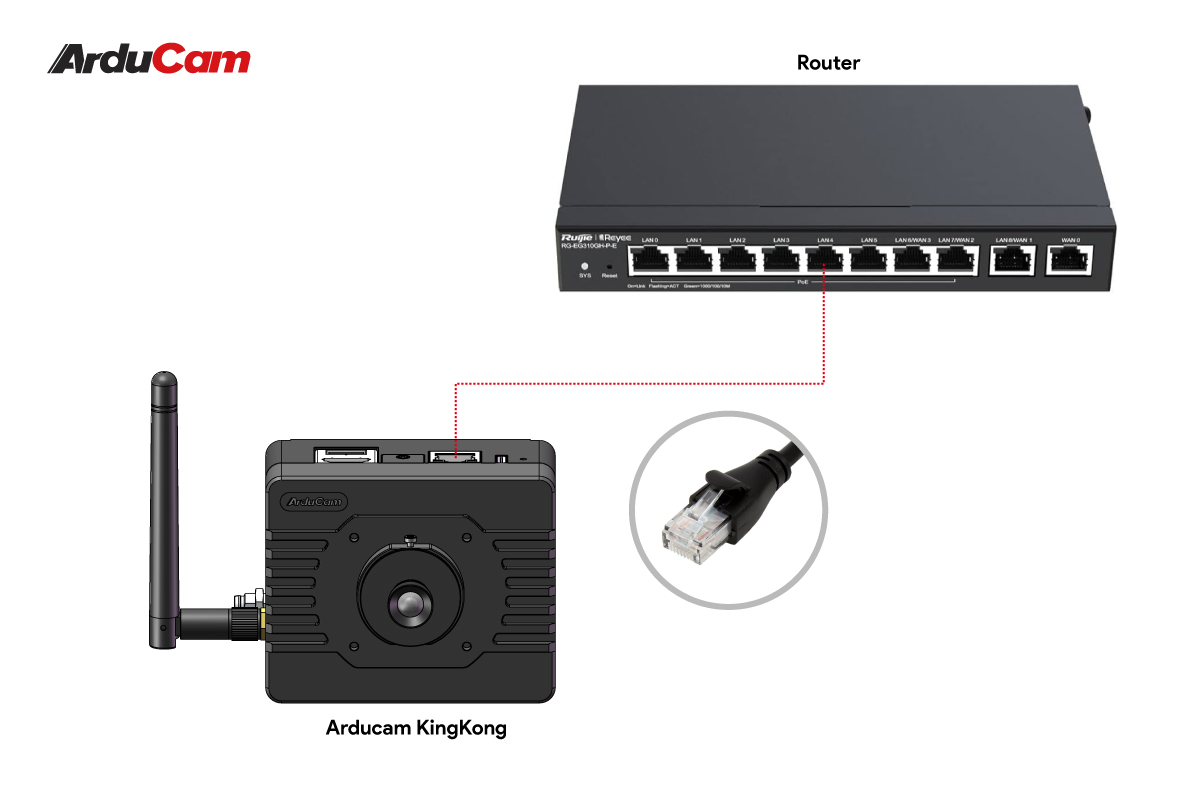
Option 2. Connect the router with Ethernet cable
Hardware Connection
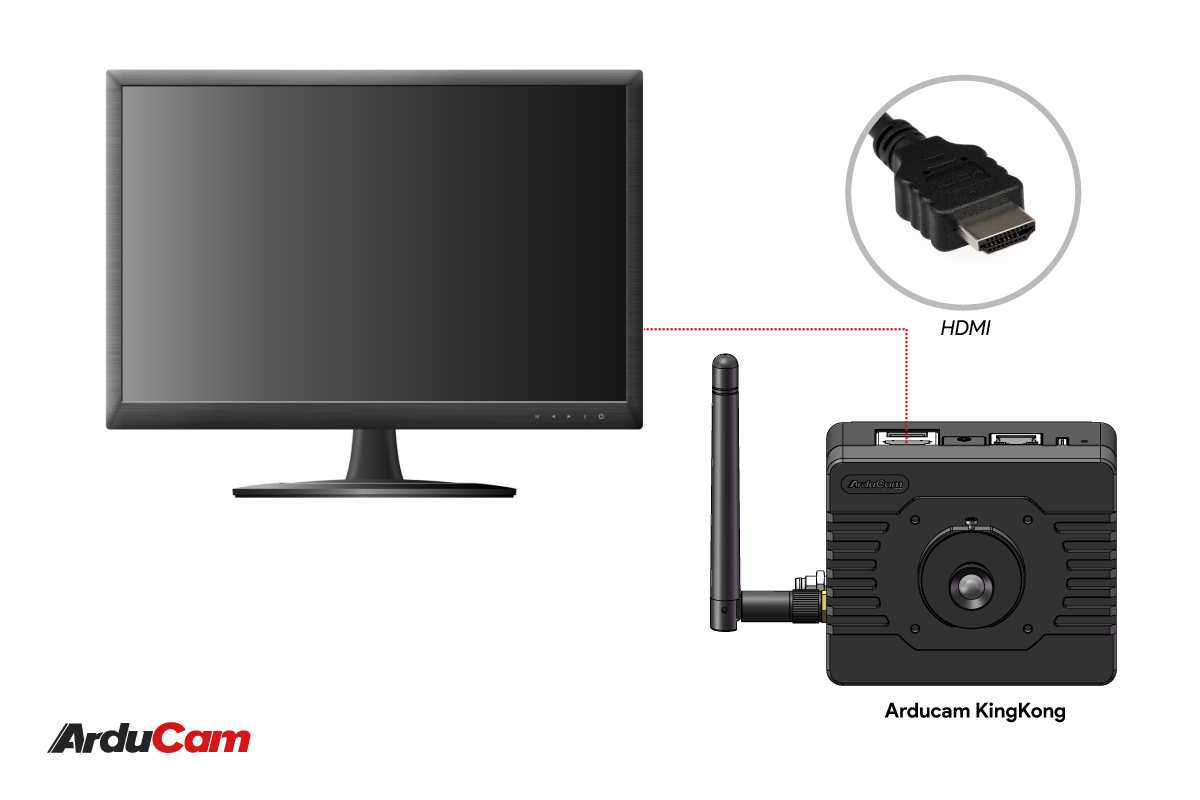
Connect Arducam KingKong to the router using an Ethernet cable. And connect the monitor to KingKong using an HDMI cable.
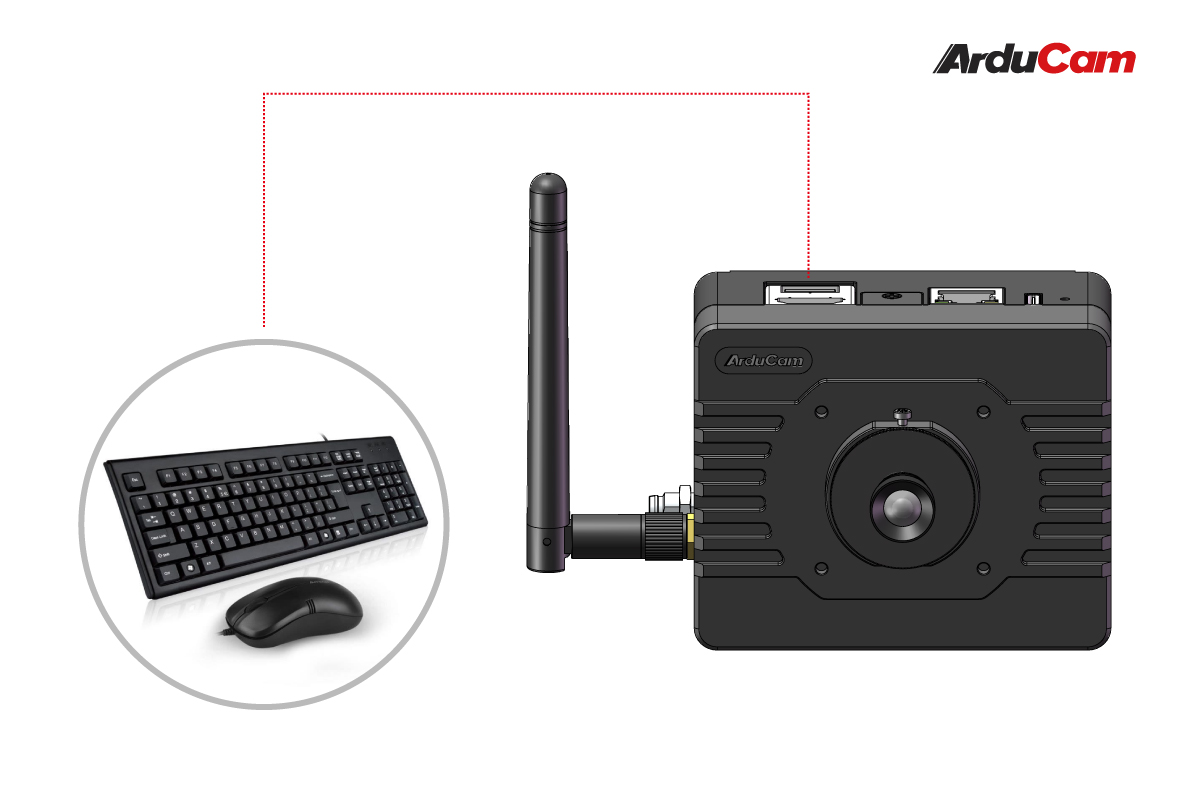
You can choose a keyboard as a peripheral.
- Step1.
Connect the power supply and Ethernet cable to Kingkong
- Step2.
Connect the Ethernet cable to router
- Step3.
Connect the monitor with HDMI Cable
- Step4.
Connect peripherals (keyboard or mouse). You can also connect more peripherals through the USB hub.
Software Operation
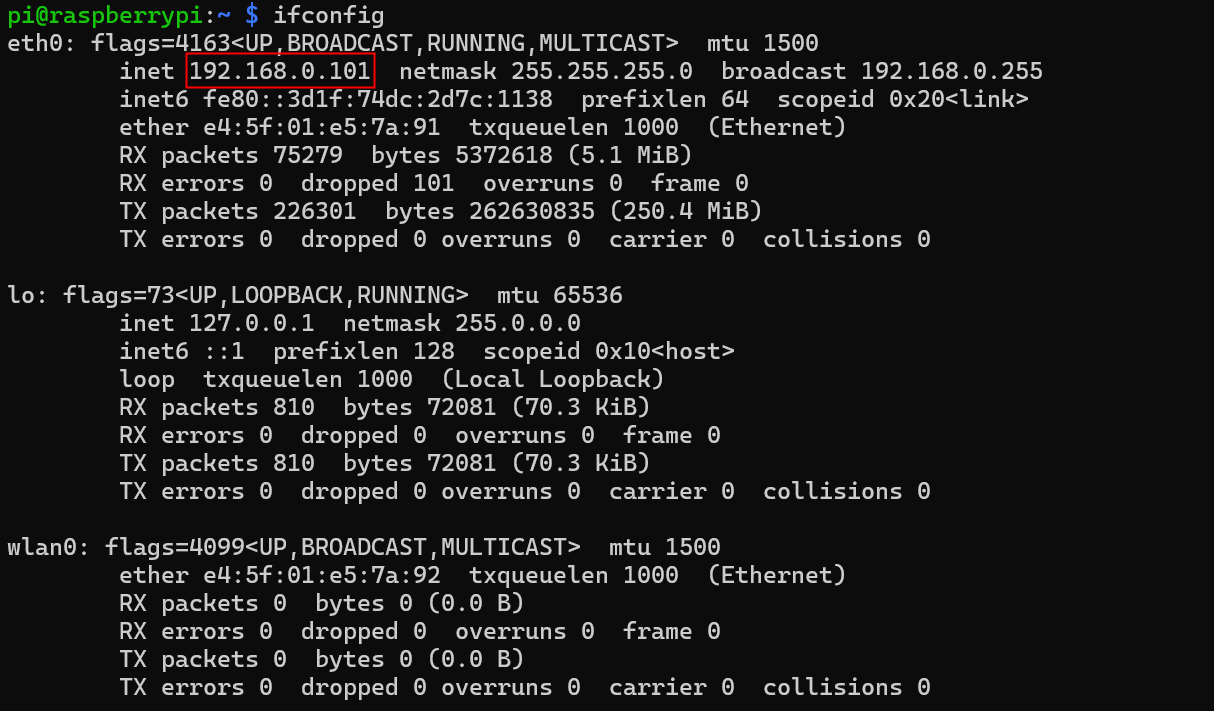
- Step1. Find the Device IP address:
After the connection is completed, you can log in to the system and use the command to view the IP.
Enter the terminal, and then use the following command to view:
ifconfig
Example:
- Step2. Enter
http://<ip address>:8081on the host web page to enter the network service interface
Homepage
Network service page:
Display the camera status, including format, resolution, frame rate,etc.:
Displays the endpoint status, which only exists when using the camera-streamer service and can be accessed directly through the displayed link.
Tip
The modes contains push streaming modes of various protocols.
Among them, rstp needs streaming software, such as vlc. The rest can be used in web pages.
Settings
Network Setting:
List all network ports. You can switch between static IP and dynamic IP for a single network port.
For example: switch the current IP address to a static or dynamic address:
Toggle and switch service plugins:
1. libcamera-net
Based on the http push service implemented by libcamera, you can choose different post-processing methods and push the processed images to the front-end page for preview.
2. discovery_server
Used to discover other devices and control all devices to take photos.
Note
AfMode control does not have camera support. The remaining functions can be controlled by sliding the slider.
Run the AI Demos
Note
You will need an HDMI cable to connect a monitor to display the demos.
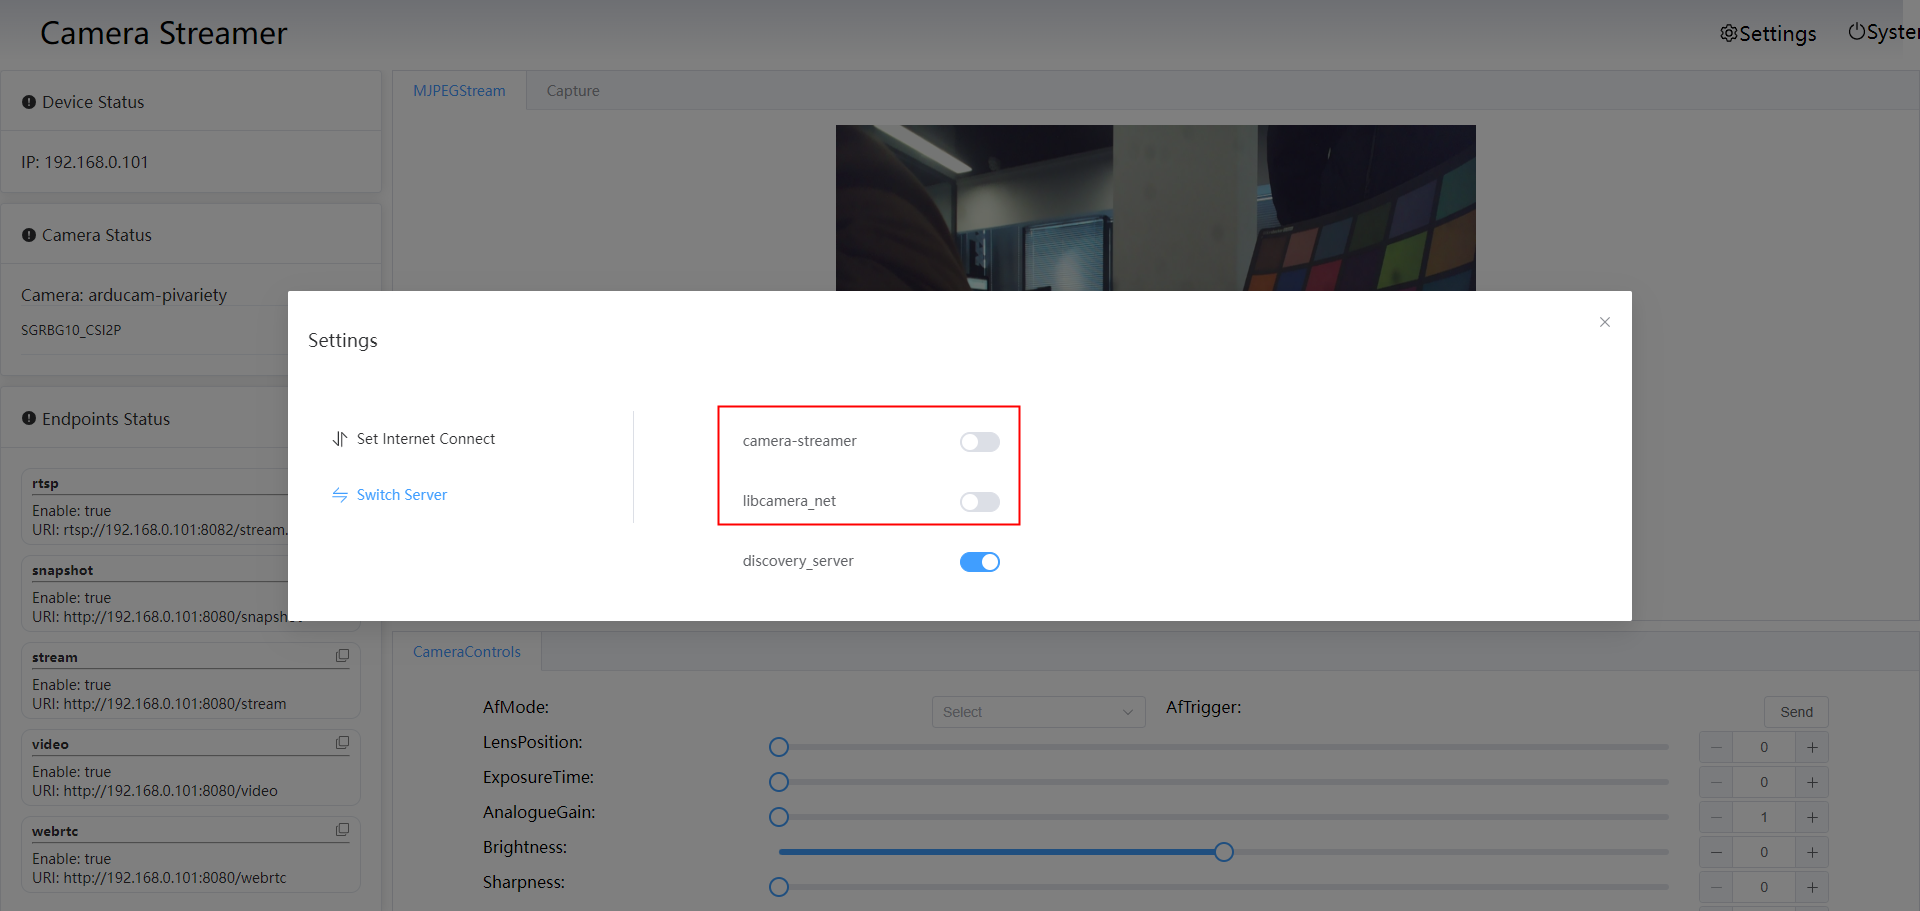
1. Turn off the Push Streaming service (it is enabled by default).
In Settings, turn off all the areas selected by the red box below. If you need network streaming later, please come back here to restart it.
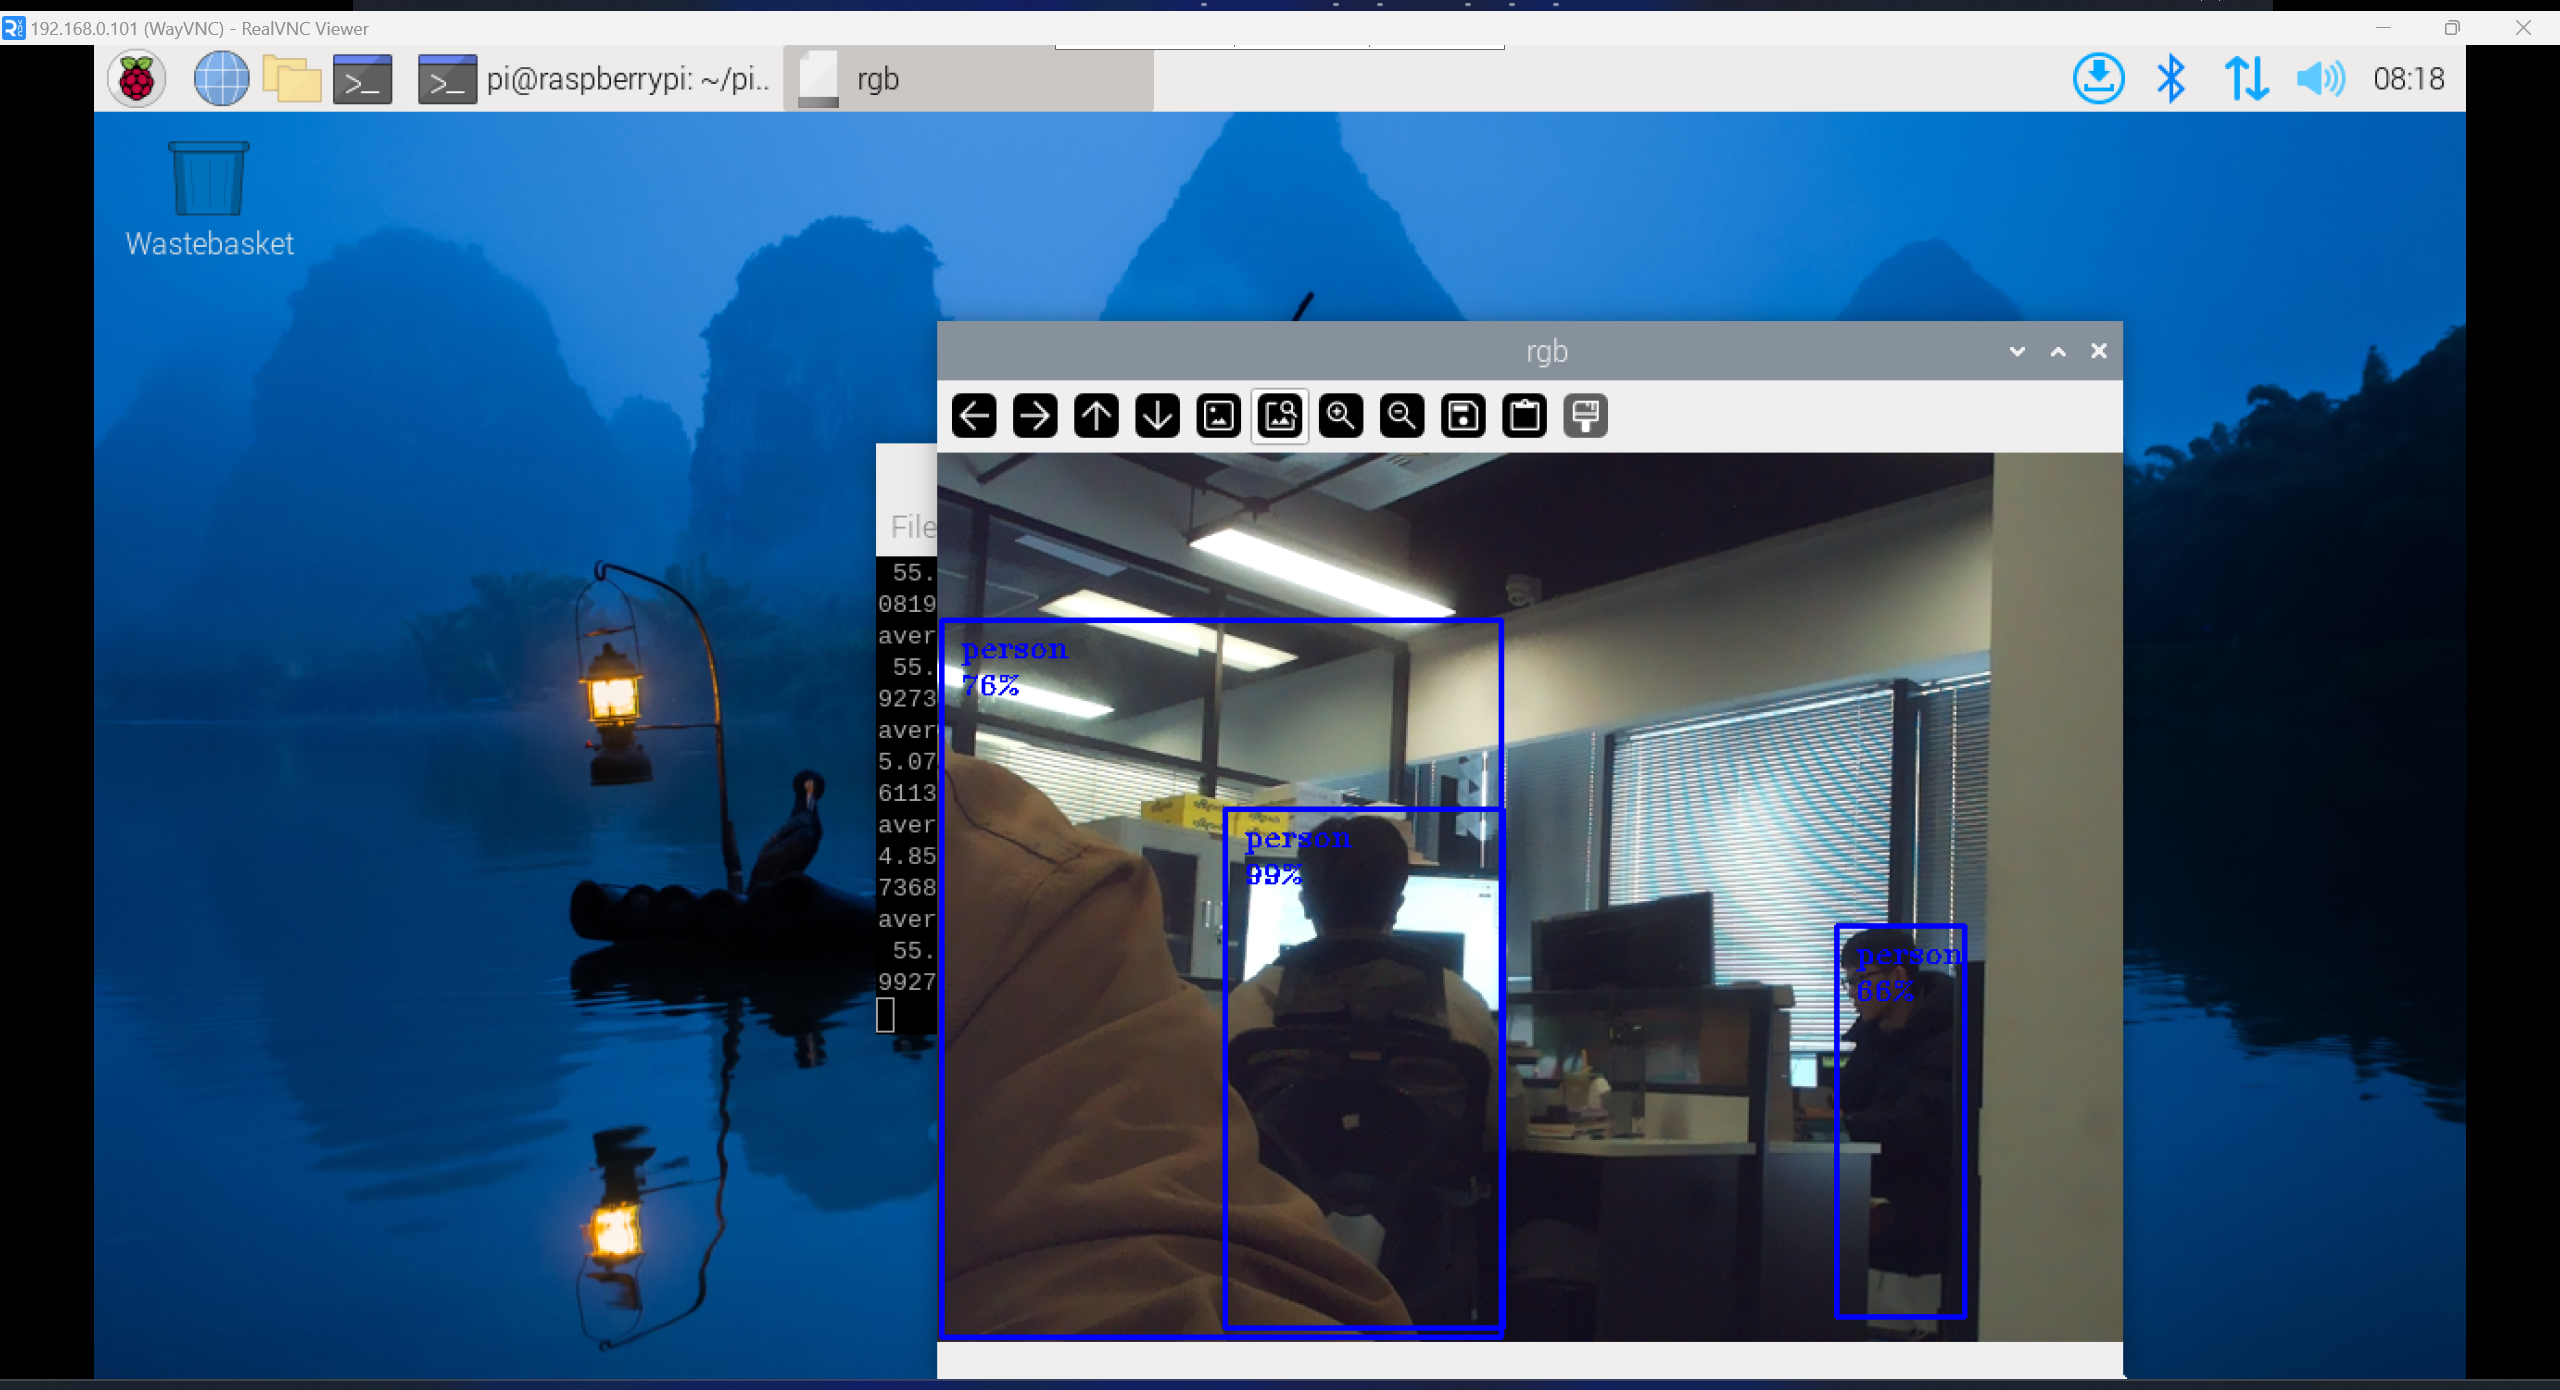
2. Run the demo

cd picamera2_oak_demo

python demo.py
External Trigger
External Trigger Connection
Please use the connecting cable (M8-8A) in the picture below to connect the device to the trigger. The connection port has been marked in the picture. (Both ends can be connected)
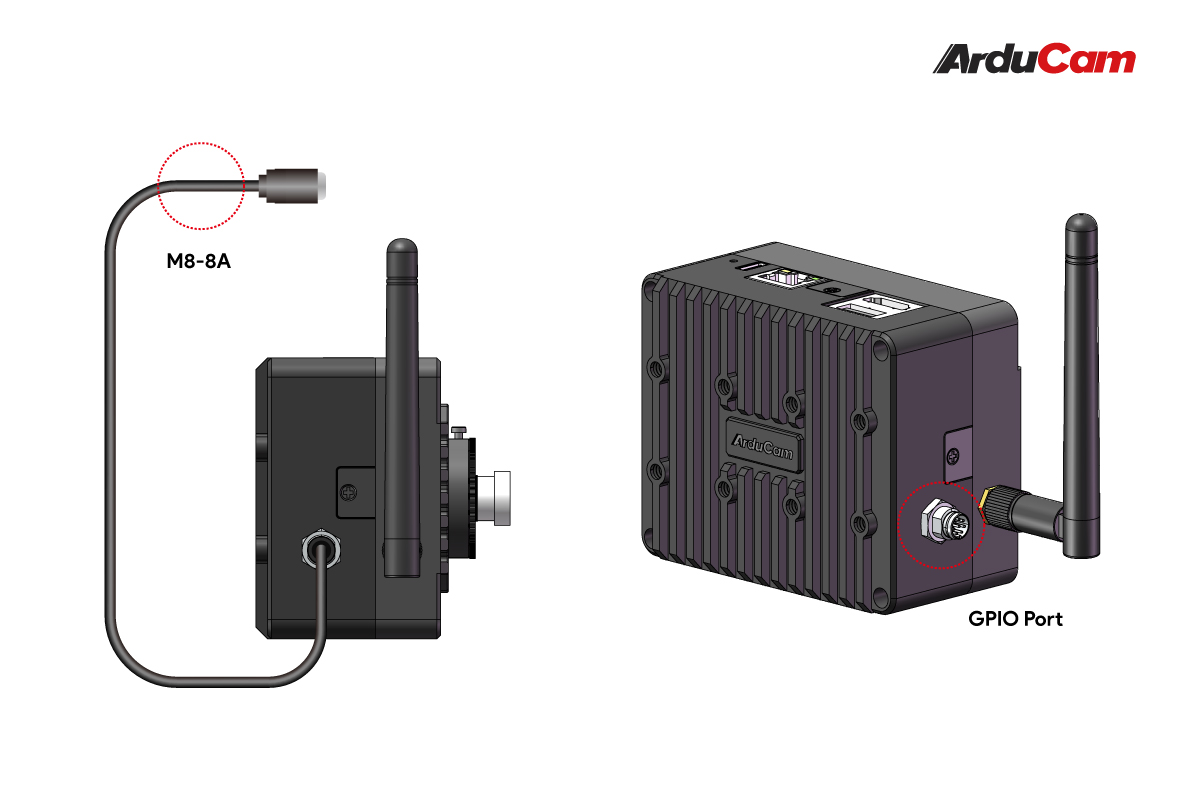
Pin Definition
Circular Connector Pin out:
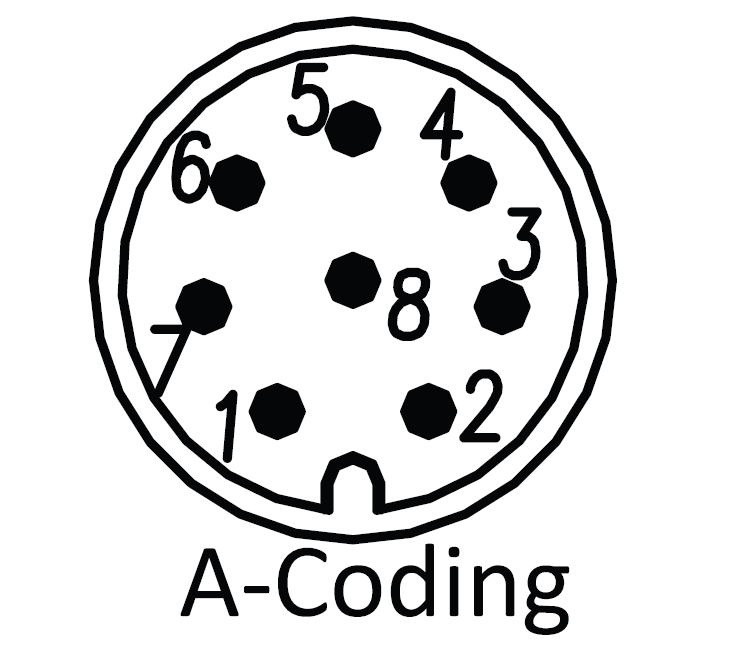
Corresponding signal definition:
Trigger signal requirements:
Pulse level 3.3V, recommended duration 500us-1ms
Enter external trigger mode
- Step1. Find IP address
You can select the corresponding Tutorial on obtaining IP address according to your Ethernet cable connection option below:
IP address acquisition - Option 1. Connect the host with Ethernet Cable
IP address acquisition - Option 2. Connect the router with Ethernet cable
- Step2. Connect the Device
According to the previous step, we got the device IP address and can now log in remotely to access the AI function.
#Default username and password
user:pi
passwd: raspberrypi
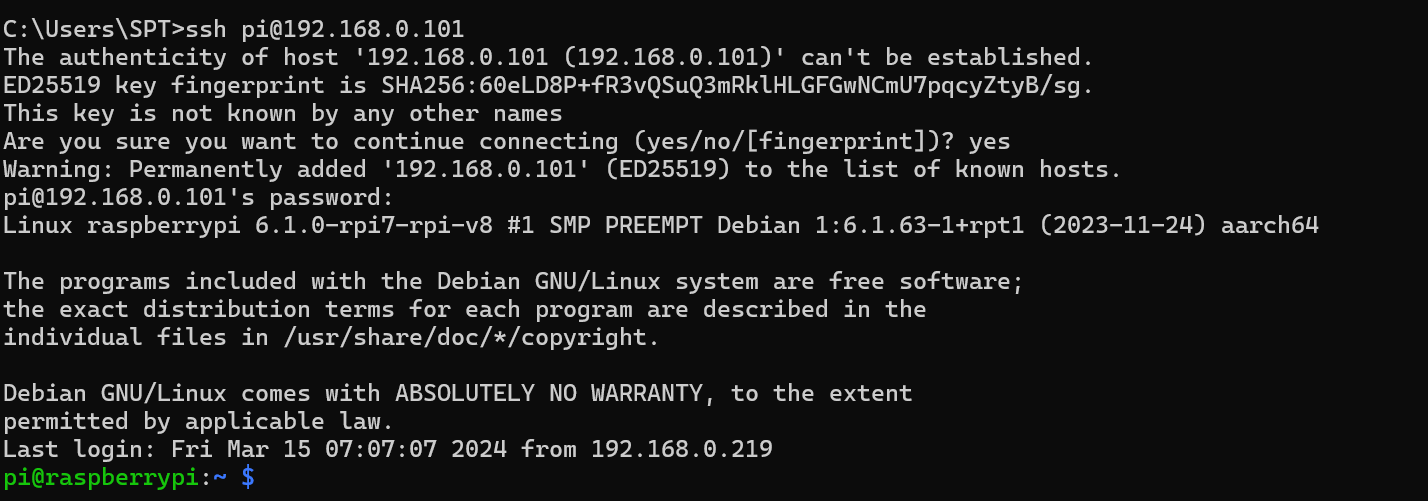
Open the terminal and input the following commands (supported by both Windows and Linux systems)
ssh pi@<ip_address>
example:
ssh pi@192.168.0.101
- Step3. Enter external trigger mode
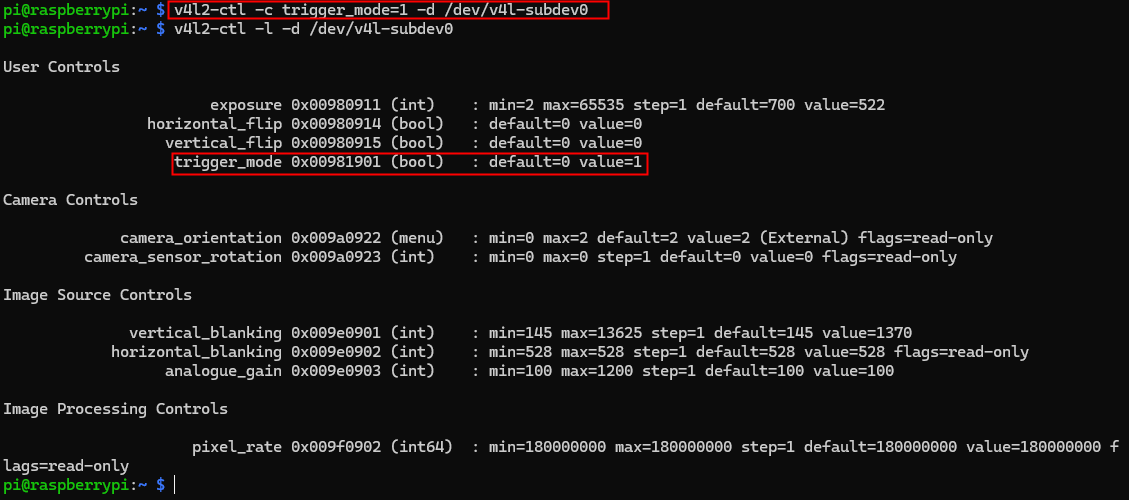
After connecting the device, please execute the following command on the terminal to enter the external trigger mode:
v4l2-ctl -c trigger_mode=1 -d /dev/v4l-subdev0
If we use v4l2-ctl -l -d /dev/v4l-subdev0 and find that the value of the trigger_mode part in the User Controls is 1, it means that the external trigger mode has been correctly entered.
วิธีการชำระเงิน
ชำระเงินค่าสินค้าโดยการโอนเงินเข้าบัญชีธนาคาร KBANK, SCB, BBL,TMB
กรุณาเก็บหลักฐานการโอนเงินของท่านไว้เพื่อแจ้งการชำระเงินด้วยค่ะ
ท่านสามารถแจ้งการชำระเงินผ่านระบบอัตโนมัติได้โดย Click Link ข้างล่างค่ะ
https://www.arduitronics.com/informpayment
ชำระเงินผ่านธนาคาร


@rfm0967y
ติดต่อสอบถาม
Join เป็นสมาชิกร้านค้า
MEMBER
