
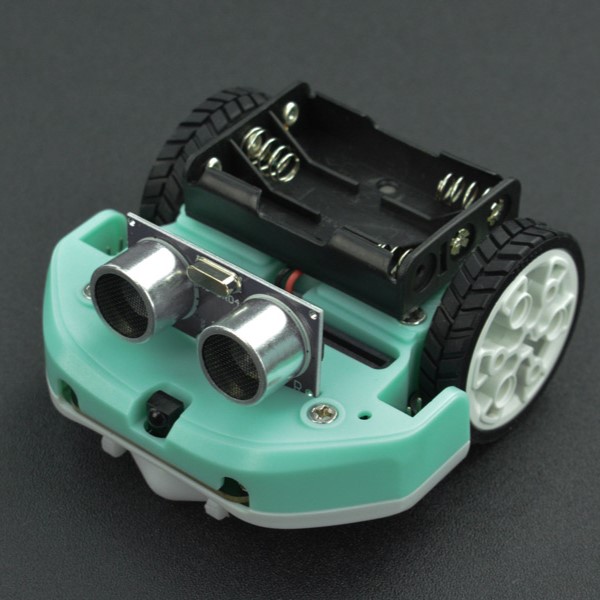
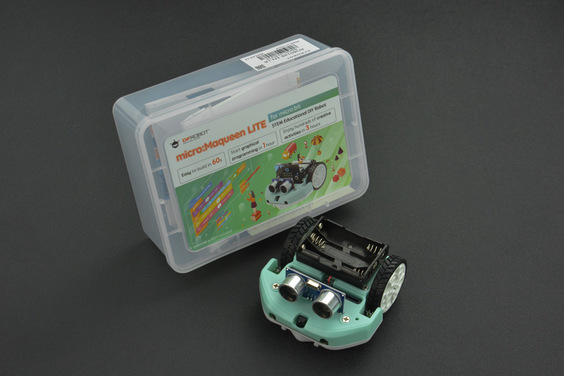
micro: Maqueen Lite with Skin (Green) - micro:bit Educational Programming Robot Platform (แท้จาก DFRobot)


| รหัสสินค้า | RU10039 |
| หมวดหมู่ | Learning Kits / Smart Car Kits |
| ราคา | 2,450.00 บาท |
| สถานะสินค้า | พร้อมส่ง |
| จำนวน | ชิ้น |

รายละเอียดสินค้า
Robot Maqueen เป็น Robot ประเภท Car ขนาดเล็ก สามารถเขียนโปรแกรมควบคุมการทำงานอาทิเช่น เดินตามเส้น, หลบหลีกวัตถุ เป็นต้น โดยใช้บอร์ด MCU Micro:bit ในการเขียนโปรแกรมพัฒนา ซึ่งทำให้ง่ายและเรียนรู้ได้เร็ว เหมาะสำ หรับเด็กๆในการเริ่มต้นเรียนรู้เกี่ยวกับ Robot ในยุคดิจิตอล ในส่วนของการประกอบติดตั้งใช้งาน Robot ก็สามารถทำ ได้ง่ายดายไม่กี่ขั้นตอน ดูตัวอย่างการใช้งาน และ coding ได้ที่ Click
หมายเหตุ: สินค้าไม่รวมบอร์ด micro:bit และ ถ่าน นะคะ แนะนำให้ซื้อร่วมกับ BA20070
Introductions:
Suggest Age: 8 +
| Product | micro: Maqueen Lite with skin | micro: Maqueen |
| Installed | √
(Parts & skin have been installed before delivery)
|
×
(Spare Parts)
|
| Map |
√
|
× |
| Color |
Red / White / Blue / Green |
Not selectable |


LED Light Flash and RGB Breathing Ambient Light:


Light-operated Sprite:
![]()
Line Tracking:
![]()
FEATURES
- Exquisite appearance and lively colors, popular with kids
- No need to install, get started in minutes
- Latest Maqueen 4.2 core, stable and steady performance
- Support micro:bit V1 and V2 and Maqueen Mechanic Kit
APPLICATIONS
- STEM Education
SPECIFICATION
Maqueen Lite:
- Supply Voltage: 3.5V~5V DC (Three AAA batteries)
- Infrared Line-tracking Sensor (High/low level) x 2
- Buzzer x 1
- Infrared Receiver (NEC encode) x 1
- LED Car Lights (High/low-level control) x 2
- RGB Ambient Light (Full 16 million colors) x 4
- SR04 Ultrasonic Interface (5V) x 1
- I2C (3.3V) x 1
- Servo Port (S1 S2) x 2
- Gravity Expansion Port (P0, P1, P2) x 3
- N20 Metal Gear Motor x 2
- Motor Reduction Ratio: 1:150
- Maximum Rotate Speed: 133 rpm
- Motor Drive Mode: PWM
- Support Wheel Material: POM
- Vehicle Wheel Material: ABS
- Tyre Material: eco-friendly rubber
- Programming Method: MakeCode, Mind+
- Dimension: 81x 85 x 44mm/3.19 x 3.35 x 1.73” (micro:bit not included)
- Weight: 75.55g (Battery, micro:bit, and peripheral accessories not included)
Skin (Installed):
- Skin Material: eco-friendly ABS
- Weight: 60g
- Color: Green
DOCUMENTS
SHIPPING LIST
- Maqueen Lite Vehicle Body x1 (Note: Motors, vehicle wheels, support wheel, skin, and battery holder have been installed before delivery)
- H-SR04 Ultrasonic Sensor x1
- Line-tracking Map x1
Function Instruction

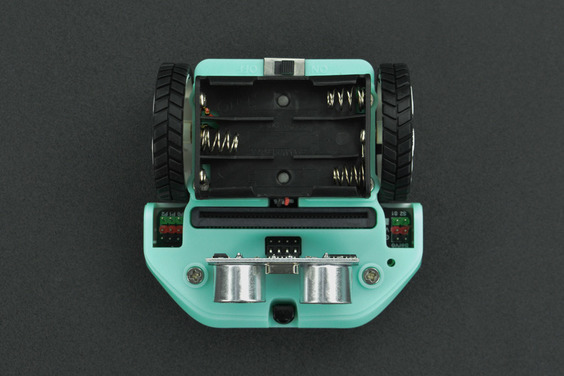
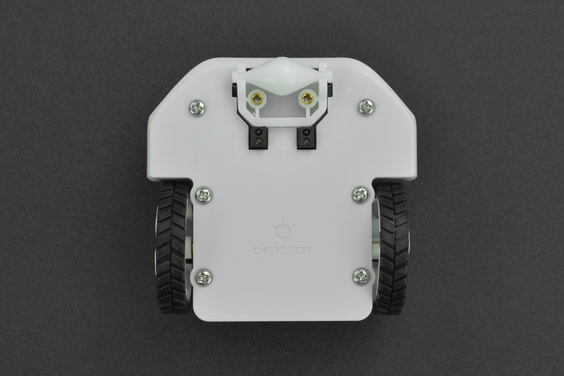
Dimensions

Battery Select & Installation
Battery Select
Maqueen Lite adopts three 1.5V AAA alkaline batteries, which have positive and negative poles for correct installation, and each one is marked with the polarity on its surface as the following picture:

Installation Method
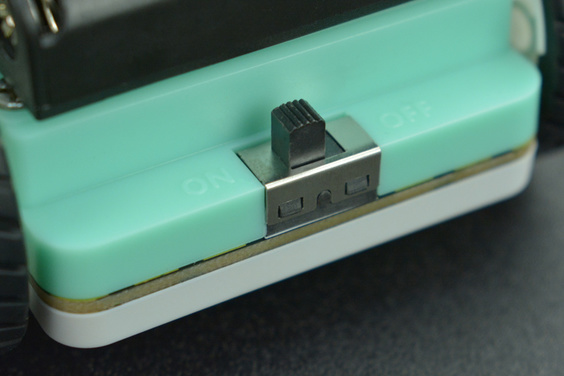
There are positive and negative poles marked inside the battery case for correct installation, please make sure the polarity of the battery matches that inside the case and the power is also "OFF" when installing the battery.

3. Introduction to Teaching Contents and Documents


This book provides a cost-efficient and fun way for primary and secondary school students to learn programming. The courses guide them to explore how to control a robot car Maqueen by coding, during which they will get to know the basics of robotics. Maqueen is a mini robot car intensively designed for STEAM education, small but powerful. It is developed based on the popular micro:bit board. Children can code Maqueen to play, learn and create so as to enhance their analytical and creative thinking skills, which is precisely what the original intention of STEAM education is. The programming software Mind+ is used in this book. Mind+ is a Scratch 3.0-based graphical programming platform that supports all kinds of open-source hardware such as Arduino and micro:bit. Drag and drop graphical code blocks to make programs, or use high-level programming languages like Python, C, C++, etc. to code. Easy to experience the joy of creating. This book is composed of 20 teaching cases, including some classic games like Catching Apple, Cat and Mouse, etc, and projects related to life scenes like Obstacle Avoidance Maqueen, Research and Rescue Maqueen. Each case is designed based on teaching practices. It aims to inspire all children to participate in programming and pave the path for them to further develop and create.
Refer to CSTA curriculum standard, the course catalog and field distribution are shown below:

3.1 Documents
Click to view online tutorial https://edu.dfrobot.com/course-661.html Click to download the tutorial 1.crazy maqueen -mindplus
2.silly maqueen -makecode And Maqueen & microbit Graphical Programming
3.Maqueen Mechanic Getting Started Guide(MakeCode)-20200929.pdfMore tutorail click here Product Pictures ROB0148-EN-LB LG LR LW product pictures.rar 4.MakeCode Programming Example (There are 14 projects in total)
Based on micro:bit and MakeCode, this tutorial mainly introduces how to use Maqueen Lite.
Quick Start Guide
Prepare a microbit board and a MicroUSB cable.

Connect the micro:bit mainboard to a PC via USB cable, and a disk with "MICROBIT" drive letter will pop up on the PC.

Click the link to visit sample codes: https://makecode.microbit.org/_7CjMuxMF84qC
Click "Edit" on the opened page.

Then click "Download" to download the codes into "MICROBIT". The download indicator of micro:bit will blink when downloading the codes, and stop after about 10s. Then the codes are downloaded successfully.

Insert the board with downloaded codes into the Maqueen mainboard.

Power ON Maqueen Lite.

At this time, the codes have been downloaded into micro:bit; the car light and ambient light are on; the Maqueen Lite starts to move forward.
4.1 Load MakeCode Graphical Library for Maqueen
Click the link: Microsoft MakeCode for micro:bit (microbit.org), enter the MakeCode graphical online programming platform.
Click "New Project" on the platform to create a new project.
Name the project as you want, for example, name it "maqueen1" and click "Create" to confirm.

Then enter MakeCode graphical programming page as shown in the following figure:

Click the Settings icon in the upper right corner and click "Extensions" in the drop-down menu.

Search the MakeCode Extensions for "dfrobot" and select "maqueen".

Load neopixel library in the MakeCode Extensions by the same way.

The loading is successful, as shows in the following figure:

4.2 Open Car Light
In this example, we aim to make the Maqueen car light blink repeatedly to indicate a starting.
4.2.1 Programming
Code Idea: turn on the left and right car lights, then turn off them after waiting for 1s, and repeat it.
Code URL: https://makecode.microbit.org/_YsgWhr2LaDcj
Code File: maqueen1.hex
Code Screenshot:

4.2.2 Result
The 2 red car LEDs of Maqueen begin to blink at 1-second intervals.

4.3 Start Engine for Preheating
In this example, we will make the ambient light at the bottom of Maqueen shows an intensive breathing effect to tell a starting.
4.3.1 Programming
Code idea: set the color variables R, G, and B of the RGB LED to 0, first gradually increase the values of the variables, then decrease them to show a breathing light effect.
Code URL: https://makecode.microbit.org/_du25LDamJgYs
Code File: maqueen2.hex
Code Screenshot:

4.3.2 Result
The bottom ambient light changes gradually from dim to bright and then back to dim.

4.4 Let's Go!
In this example, we will make Maqueen car honk 3 times and start engine to drive Maqueen.
4.4.1 Programming
Code idea: play a melody for three honks, and then set all the motors to a positive turn.
Code URL: https://makecode.microbit.org/_eKuP0cbo8TaP
Code File: maqueen3.hex
Code Screenshot:

4.4.2 Result
After three honks, the Maqueen will move forward at the speed of 50.
4.5 Motor Control
In this example, we will learn how to use the motor to control Maqueen to move forward, move backward, turn left, turn right, and stop, and adjust its speed.
4.5.1 Programming
Code idea: set the same direction and speed of the left and right motors to realize the robot car moving forward or backward; set the same direction and different speed of them to realize the left and right turns.
Code URL: https://makecode.microbit.org/_Ms2Ea7foPKXA
Code File: maqueen4.hex
Code Screenshot:

4.5.2 Result
Maqueen repeat: move forward 2 second, turn left 2 second, turn right 2 second and move backward 2 second.
4.6 Read IR Key Assignments
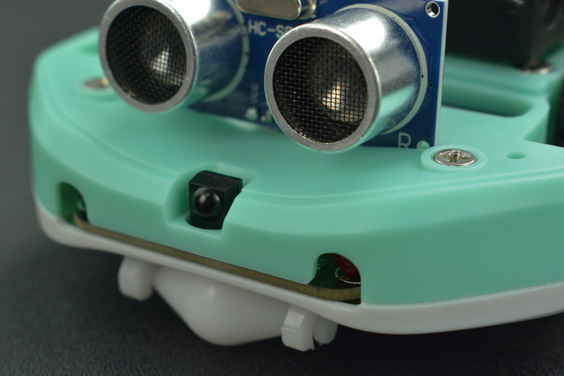
Maqueen car comes with an IR sensor at the front side to receive the IR data sent by the IR remote controller. In this example, we"ll learn how to receive IR data, read IR key assignments, and display them on the micro:bit LED matrix.
4.6.1 IR Remote Controller & the Assignments
The IR remote controller used in this example and its assignments are as shown in the following figure. IR Remote Controller: https://www.dfrobot.com.cn/goods-142.html

4.6.2 Programming
Effect: when the robot car receives IR data, they are converted to IR key assignments and display on the micro:bit LED matrix.
Code URL: https://makecode.microbit.org/_Uu14FC529YoM
Code File: maqueen5.hex
Code Screenshot:

4.6.3 Result
Press the key on the IR remote controller and the the micro:bit LED matrix will display the corresponding IR key assignments.

4.7 IR Remote Control
We have learned how to control the motor and read IR key assignments before. In this example, we will combine the two to learn how to command the robot car using the IR remote controller.
4.7.1 Programming
Effect: command the car using IR remote controller.
Code URL: https://makecode.microbit.org/_bfuHRf53RdXM
Code File: maqueen6.hex
Code Screenshot:

4.7.2 Result
Use the key 2, 8, 4, 6, and 5 on the IR remote controller to control Maqueen car to move forward, move backward, turn left, turn right and stop.
4.8 Read Line-tracking Sensor
The Maqueen car has two line-tracking sensors as shown in the following figure, and can identify exactly black and white areas.

4.8.1 Programming
Effect: when a Maqueen's line-tracking sensor is put on the black line, the sensor outputs 0, and display 0 on the micro:bit LED matrix; if put on white area, output 1 and display 1 on the LED matrix.
Code URL: https://makecode.microbit.org/_EvtX1yD0RWpj
Code File: maqueen7.hex
Code Screenshot:

4.8.2 Result
When a Maqueen's line-tracking sensor is put on the black line, the micro:bit LED matrix displays 0; if put on white area, displays 1.
4.9 Auto Line-tracking
We have learned the function of the line-tracking sensor in last example, in this one we'll learn the more interesting auto line-tracking.
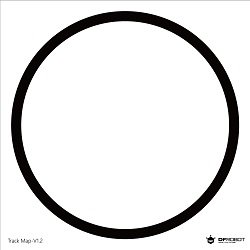
4.9.1 Line-tracking Map
The line-tracking map in the kit is used here.

4.9.2 Programming
Effect: the two line-tracking sensors work at the same time to make sure the robot car run along the black line.
Code URL: https://makecode.microbit.org/_gMTcVi5KzY6X
Code File: maqueen8.hex
Code Screenshot:

4.9.3 Result
A successful line-tracking run is done, but due to the small map, the car is set to run at a slow speed.

4.10 Ultrasonic Obstacle-avoiding
When the Maqueen car senses obstacles ahead during travelling, it will start auto-driving mode and keep it away from the obstacle by detecting the distance between it and the obstacle through the ultrasonic sensor on the front side.
4.10.1 Hardware Preparation
Take out the ultrasonic sensor in the kit as shown in the following figure: Plug the ultrasonic sensor into the corresponding port in the front side of the Maqueen car as the following picture:

4.10.2 Programming
Effect: the ultrasonic sensor detects the distance between the Maqueen and obstacle ahead, if it is smaller than 30cm, Maqueen randomly turns left or right to avoid the obstacle.
Code URL: https://makecode.microbit.org/_V0yFaqJ4EEkD
Code File: maqueen9.hex
Code Screenshot:

4.10.3 Result
Power on Maqueen and it starts to move forward. When an obstacle is detected about 30cm ahead, Maqueen randomly turns left or right to avoid the obstacle and then continues to move forward.
4.11 Light-operated Sprite
The micro:bit board comes with a light sensor. As the flashlight illuminates the LEDs on Maqueen, it starts to move forward; if the light disappears, it stops.
4.11.1 Programming
Code Idea: when light is detected, all the motor are turned on, otherwise, they are turned off.
Code URL: https://makecode.microbit.org/_bxXUwrdzudDa
Code File: maqueen10.hex
Code Screenshot:

4.11.2 Result
Download the codes, power on Maqueen, and put it on the floor, it won't move. Turn on the flashlight, direct it at the front of the microbit, and Maqueen car begins to move forward; turn off the flashlight, and it stops.

4.12 Sound-controlled Maqueen (only supports micro:bit V2.0 or later)
There is an additional sound sensor on micro:bit V2.0 motherboard or later for sensing the ambient sound. This feature help command Maqueen car by sound.
4.12.1 Programming
Effect: clap hands to command RGB LED on the bottom of Maqueen car, clap hands once to change a color and the micro:bit LED matrix displays a different pattern.
Code URL: https://makecode.microbit.org/_50h4LHPqj4FA
Code File: maqueen11.hex
Code Screenshot:

4.12.2 Result
clap hands in proper order to make the bottom RGB LED show red, orange, yellow, green, blue, purple and white colors, and the LED matrix display different patterns successively.

4.13 GamePad for micro:bit - Remote-Controlled Maqueen
In this example, we set the analog rocker as switch quantity to control the robot car to move forward, move backward, turn left, turn right, and use the left and right keys (F and D keys) to control the the left and right car lights to be on/off.
4.13.1 Hardware Preparation
GamePad for micro:bit: https://www.dfrobot.com/product-1711.html

Programming
Effect: control the moving direction of the robot car using analog rocker, press F key to light up the left light and D to light up the right.
Code URL for Gamepad: https://makecode.microbit.org/_i1fAXXFhR754
Code File: maqueen12-1.hex
Code Screenshot:

Code URL for Maqueen Lite:https://makecode.microbit.org/_YAjXaY6XARRg
Code File: maqueen12-2.hex
Code Screenshot:

4.13.3 Result
Gamepad Status Robot Car Movement Mode Move the rocker upward Move forward Move the rocker down Move backward Move the rocker left Turn left Move the rocker right Turn right Rocker in middle position Stop Key F (Blue) Left light on Key D (Yellow) Right light on In last example, we can only control the robot car to move forward, move backward, turn left and turn right, but can't control its speed. The next routine will show how to use rocker analog quantity to control both the moving direction and speed of the car. The more you move the rocker, the faster the speed. The left and right keys (F and D) can be used to control the lights to be on/off.
4.13.4 Programming
Effect: control the moving direction and speed of the robot car usign analog stick, press F key to light up the left light and D to light up the right.
Code URL: https://makecode.microbit.org/_KLDU7p4ar7FL
Code File: maqueen13-1.hex
Code Screenshot:

Code URL for Maqueen Lite: https://makecode.microbit.org/_CyJWYvh1y94k
Code File: maqueen13-2.hex
Code Screenshot:

4.13.5 Result
The more you move the rocker, the faster the speed of the car.
Gamepad Status Robot Car Movement Mode Move the rocker upward Move forward Move the rocker down Move backward Move the rocker left Turn left Move the rocker right Turn right Rocker in middle position Stop Key F (Blue) Left light on Key D (Yellow) Right light on 4.14 Maqueen Mechanic-Loader
In this example, we will learn driving servo with Maqueen mechanic-loader kit and IR remote controller.
4.14.1 Hardware Preparation
micro:Maqueen Mechanic-Loader: https://www.dfrobot.com/product-2006.html

Installation Method:

Then plug the servo wires to the port S1 of Maqueen as shown in the figure. Don't mitake the direction, brown wire to black pin, red wire to red pin, orange wire to the green pin:

The hardware preparation is complete as shown in the following figure.

4.14.2 Control Servo
In this example, we will learn how to controll servo.
4.14.2.1 Programming
Effect: make the shovel to rotate up and down.
Code URL: https://makecode.microbit.org/_1wHJrqgRYHko
Code File: maqueen14-1.hex
Code Screenshot:

4.14.2.2 Result
Turn Maqueen on, then the shovel will turn up and down at 90°.
There are two ways to adjust the starting and ending angles of rotation: 1. Adjust the angle value in the code as your need. 2. Remove the two screws on the servo and turn the servo by hand, then reinstall the screws.4.14.3 IR Remote Control of the Shovel
This example will teach you how to use the IR remote controller to make the shovel rotate up and down.
4.14.3.1 Programming
Effect: use the IR remote controller to control the shovel rotation angle.
Code URL: https://makecode.microbit.org/_CFMhwL03TK5q
Code File: maqueen14-2.hex
Code Screenshot:

4.14.3.2 Result
Use the IR remote controller to make the shovel rotate up and down by directing it at the IR receiver in the front side of Maqueen and pressing the upper and lower triangle keys.
4.14.4 IR Remote Control of the Maqueen Mechanic-Loader
In the two examples above, we have controlled the movement of the shovel separately. This one will combine the shovel with Maqueen car.
4.14.4.1 Programming
Effect: use the IR remote controller to control the Maqueen car to move and the shovel to rotate up and down.
Code URL: https://makecode.microbit.org/_bkvP19V7a6v8
Code File: maqueen14-3.hex
Code Screenshot:

4.14.4.2 Result
In this example, keys 2, 8, 4, 6, 5 are used to control Maqueen to move forward, move backward, turn left, turn right and stop; press the upper triangle key to control the shovel to turn up, and press the lower for turning down.
วิธีการชำระเงิน
ชำระเงินค่าสินค้าโดยการโอนเงินเข้าบัญชีธนาคาร KBANK, SCB, BBL,TMB
กรุณาเก็บหลักฐานการโอนเงินของท่านไว้เพื่อแจ้งการชำระเงินด้วยค่ะ
ท่านสามารถแจ้งการชำระเงินผ่านระบบอัตโนมัติได้โดย Click Link ข้างล่างค่ะ
https://www.arduitronics.com/informpayment
ชำระเงินผ่านธนาคาร


@rfm0967y
ติดต่อสอบถาม
Join เป็นสมาชิกร้านค้า
MEMBER
