
[จัดส่งฟรี] Raspberry Pi 5 (แรม 8GB) ของแท้ made in UK
![[จัดส่งฟรี] Raspberry Pi 5 (แรม 8GB) ของแท้ made in UK](https://o.lnwfile.com/_/o/_raw/5a/ku/8o.jpg)
![[จัดส่งฟรี] Raspberry Pi 5 (แรม 8GB) ของแท้ made in UK](https://o.lnwfile.com/_/o/_raw/ji/t4/a2.jpg)
![[จัดส่งฟรี] Raspberry Pi 5 (แรม 8GB) ของแท้ made in UK](https://o.lnwfile.com/_/o/_raw/17/vo/s1.jpg)
![[จัดส่งฟรี] Raspberry Pi 5 (แรม 8GB) ของแท้ made in UK](https://o.lnwfile.com/_/o/_raw/ih/oi/5l.jpg)

รายละเอียดสินค้า
ดูวิธีเริ่มต้นการใช้งาน ด้านล่าง !!
หมายเหตุ: บอร์ด Raspberry Pi 5 ใช้ OS Bookworm เท่านั้น ซึ่งสามารถดาวน์โหลดและ flash micsoSDcard ได้จาก Latest RPi OS
INTRODUCTION
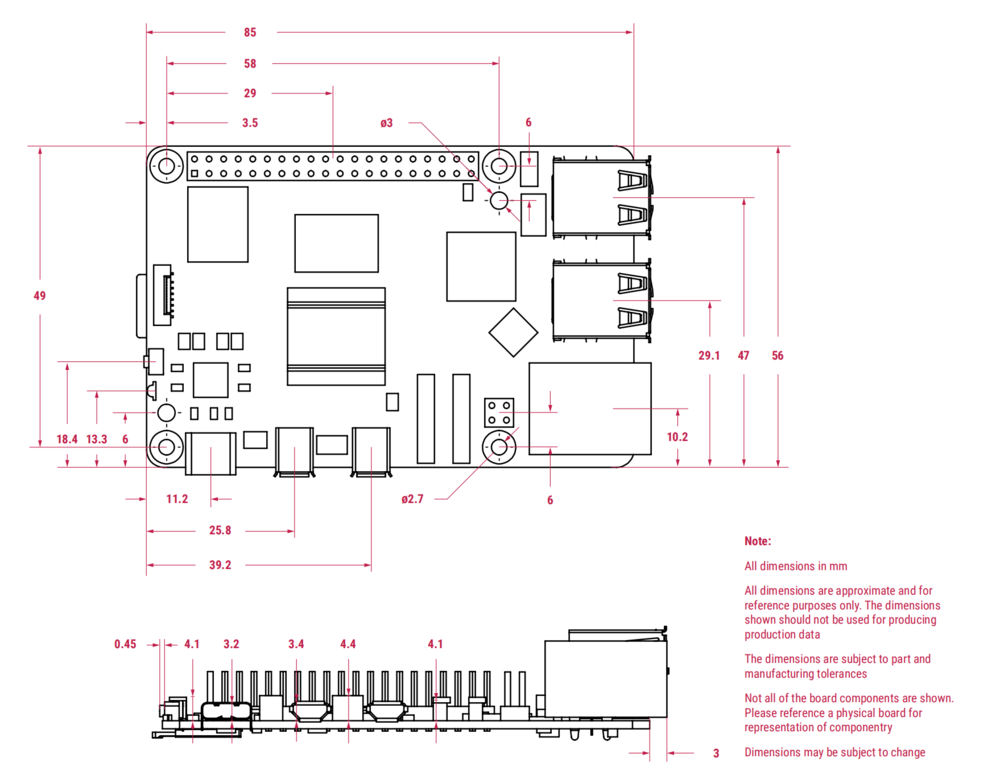
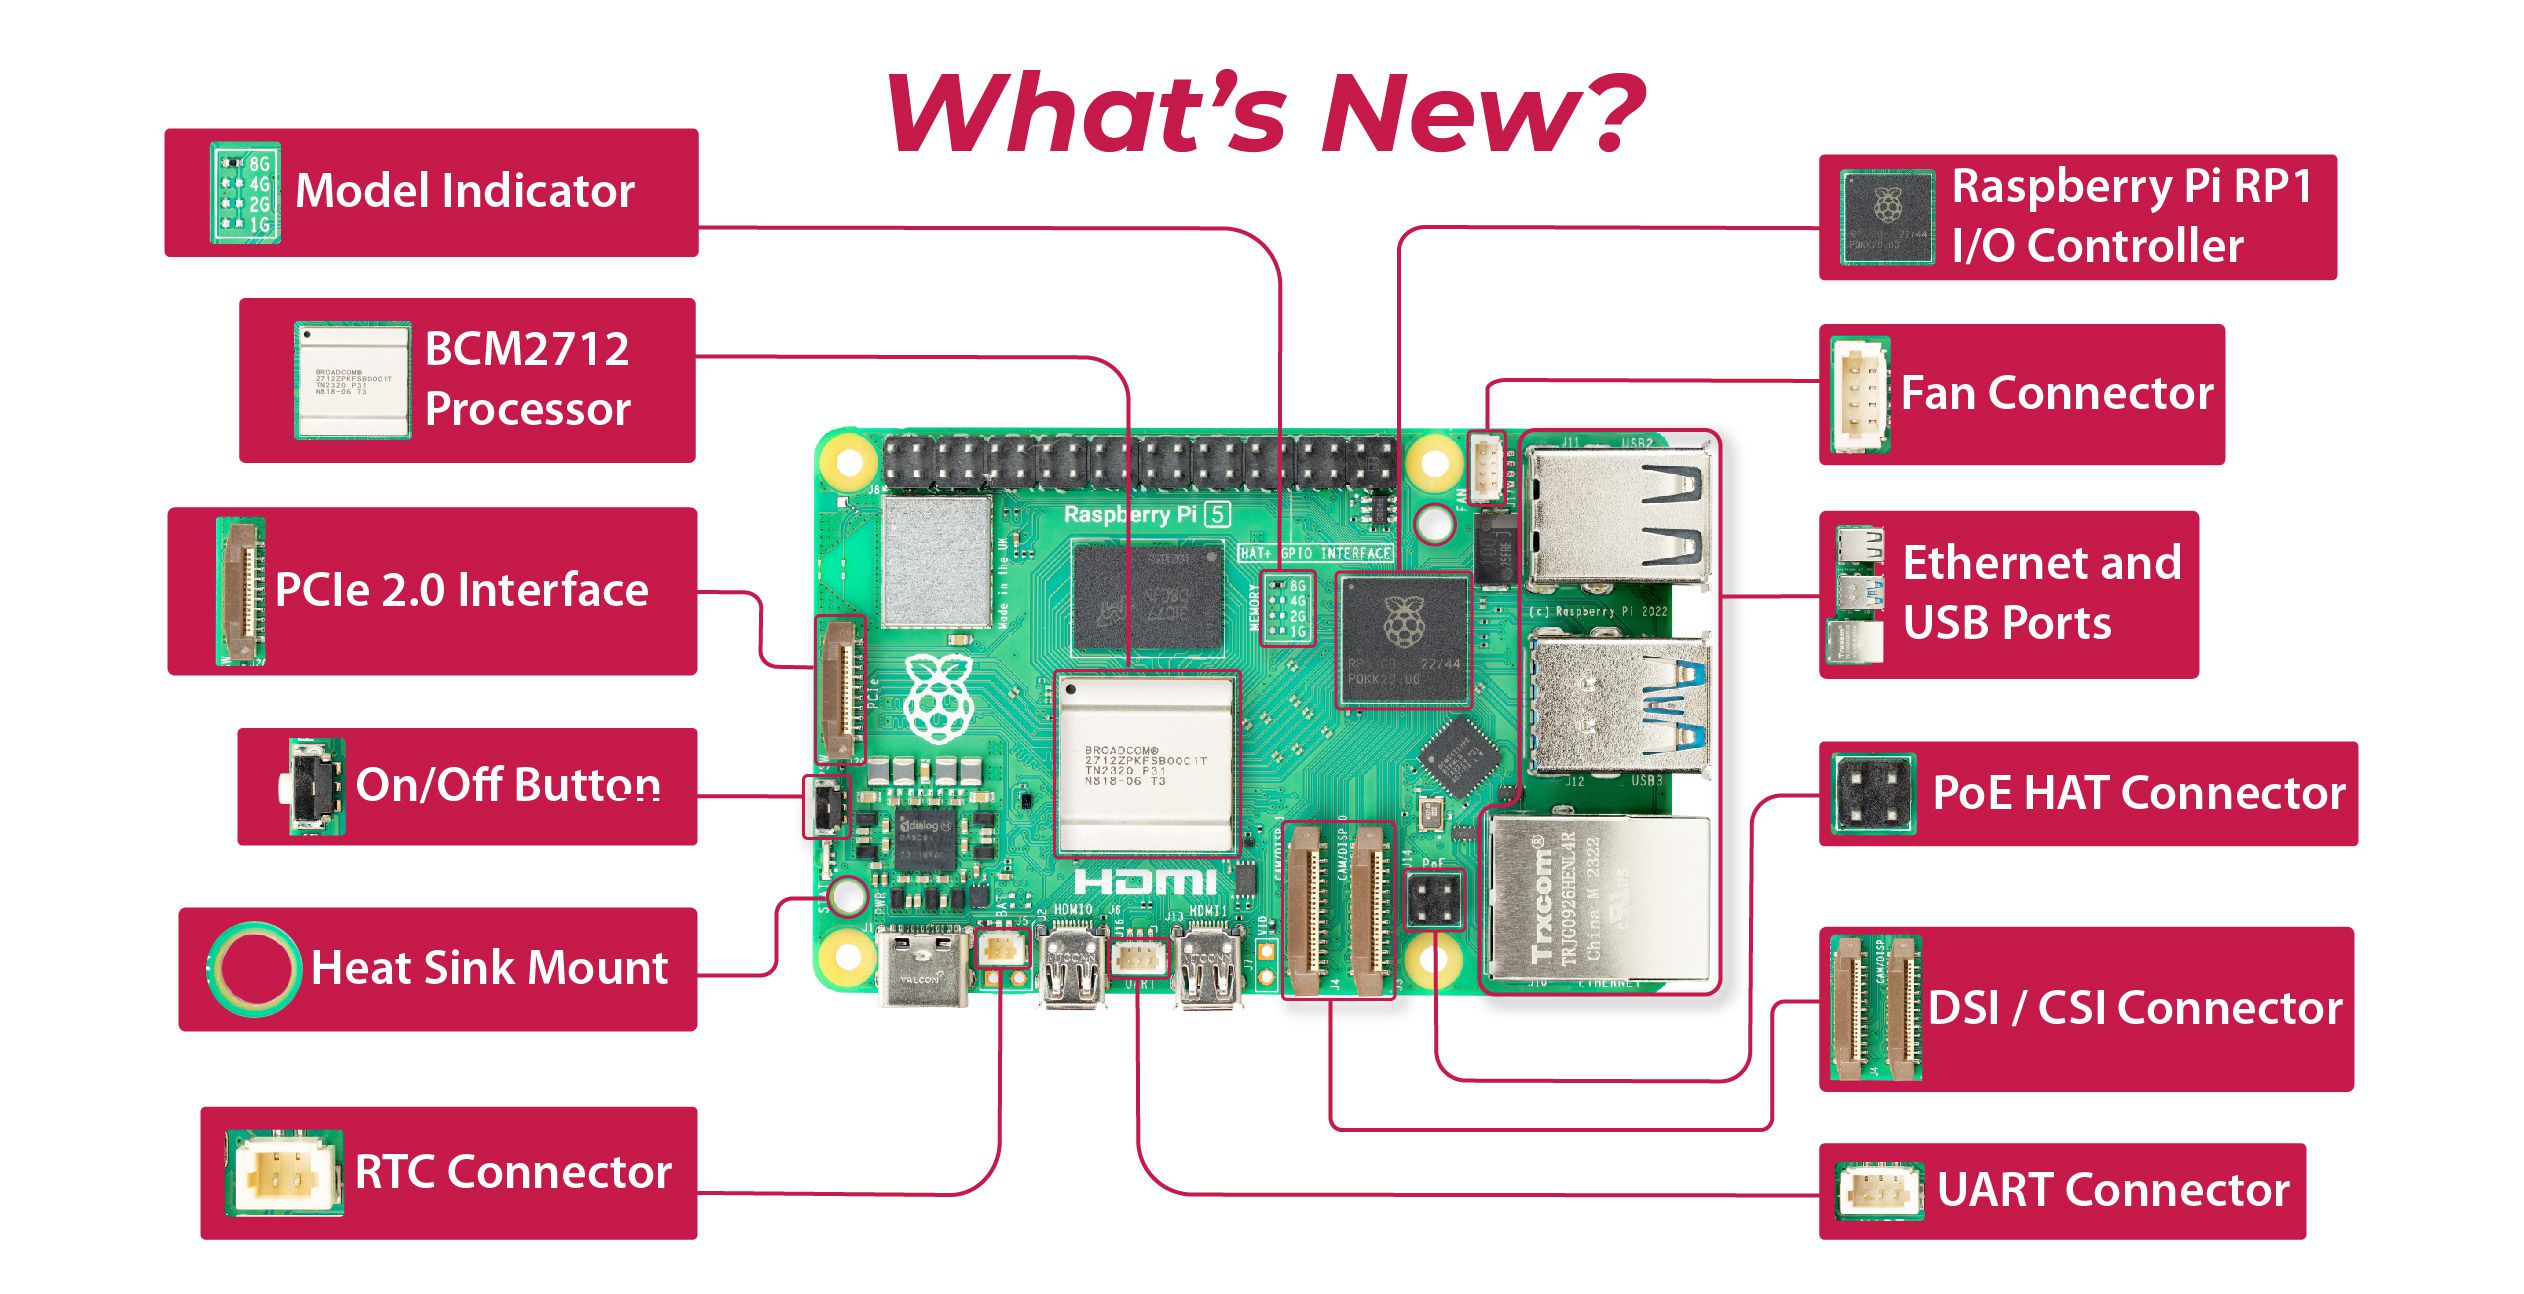
Interface Diagram of Raspberry Pi 5 single-board computer
Comparison between 5B and 4B

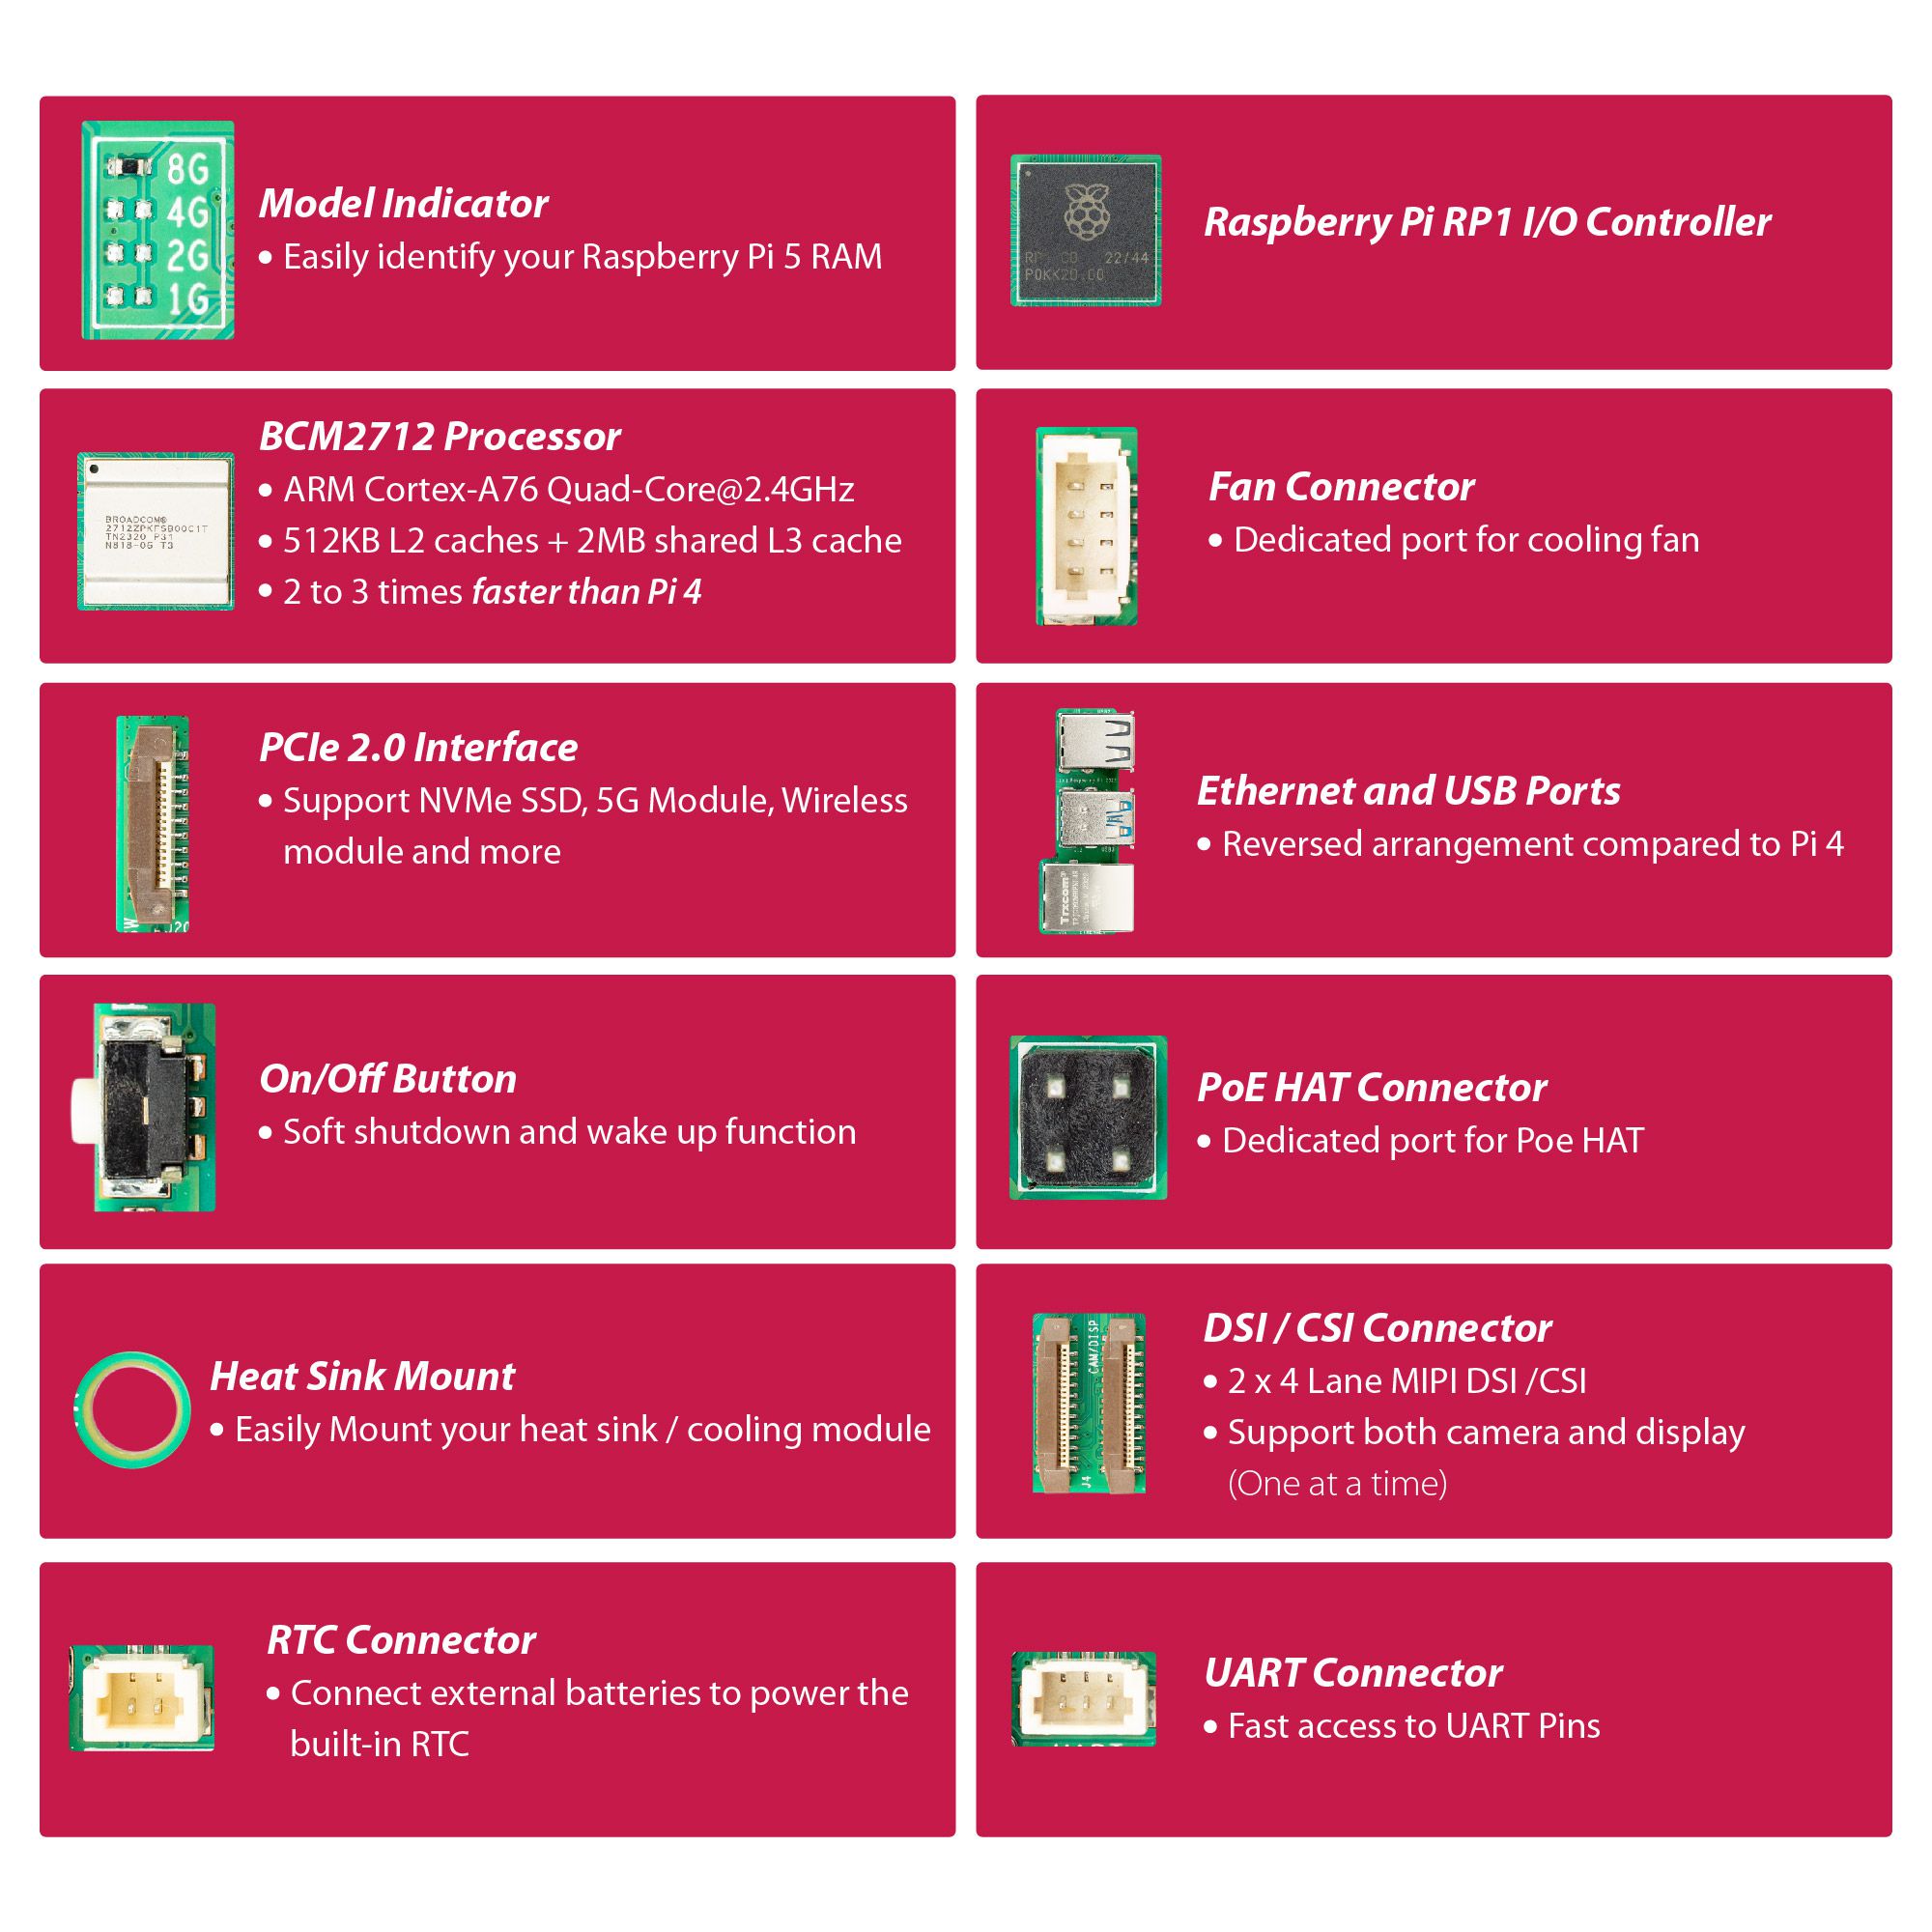
FEATURES
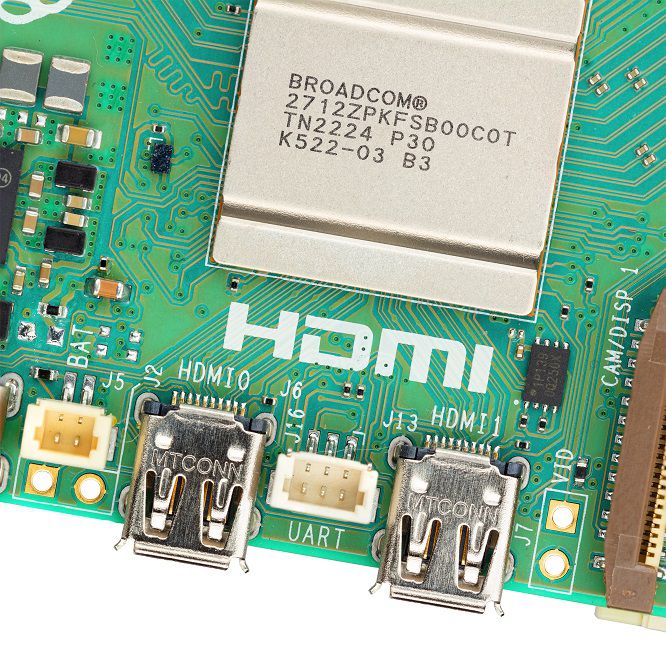
- Raspberry Pi Fifth Flagship Development Computer: Feature a 64-bit quad-core Arm Cortex-A76 processor running at 2.4GHz, using silicon built in-house at Raspberry Pi, offering a step change in peripheral performance and functionality
- Significant Graphics Capability: Equip an 800MHz VideoCore VII GPU and deliver better graphics performance, suitable for multimedia applications, gaming, and graphics-intensive tasks
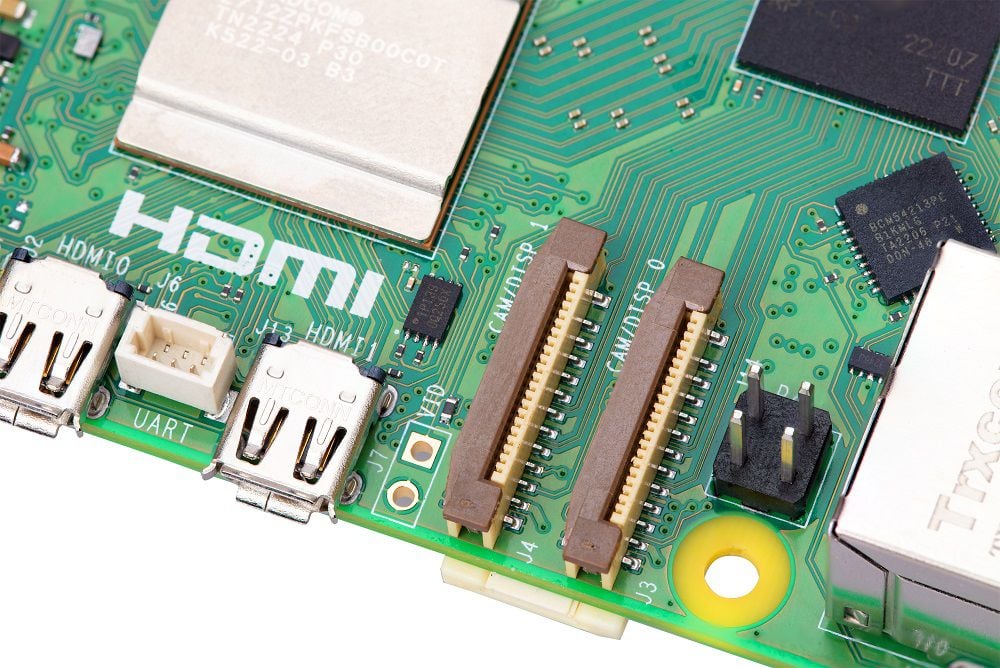
- State-of-the-Art Camera Support: Built with the dedicated dual 4-lane 1Gbps MIPI DSI/CSI connectors, tripling total bandwidth, and supporting any combination of up to two cameras or displays
- Versatile Connectivities: Offer Gigabit Ethernet and a PCIe interface, along with dual-band Wi-Fi and Bluetooth 5.0/BLE wireless capability
- Enhanced Peripherals: Provide 1x UART connector, 1x microSD card slot supporting high-speed, 2x USB.0 3.0 supporting sync 5Gbps operation, 2x USB2.0 ports ports, 1x RTC, 2x 4Kp60 display output with HDR support
- CPU: 2.4GHz quad-core 64-bit Arm Cortex-A76 CPU, with cryptography extensions, 512KB per-core L2 caches, and a 2MB shared L3 cache
- GPU: VideoCore VII GPU, supporting OpenGL ES 3.1, Vulkan 1.2
- Display Output: Dual 4Kp60 HDMI® display output with HDR support
- Video Decoder: 4Kp60 HEVC decoder
- RAM: 8GB LPDDR4X-4267 SDRAM
- Wi-Fi: Dual-band 802.11ac Wi-Fi®
- Bluetooth: Bluetooth 5.0/ Bluetooth Low Energy (BLE)
- Storage: microSD card slot, with support for high-speed SDR104 mode
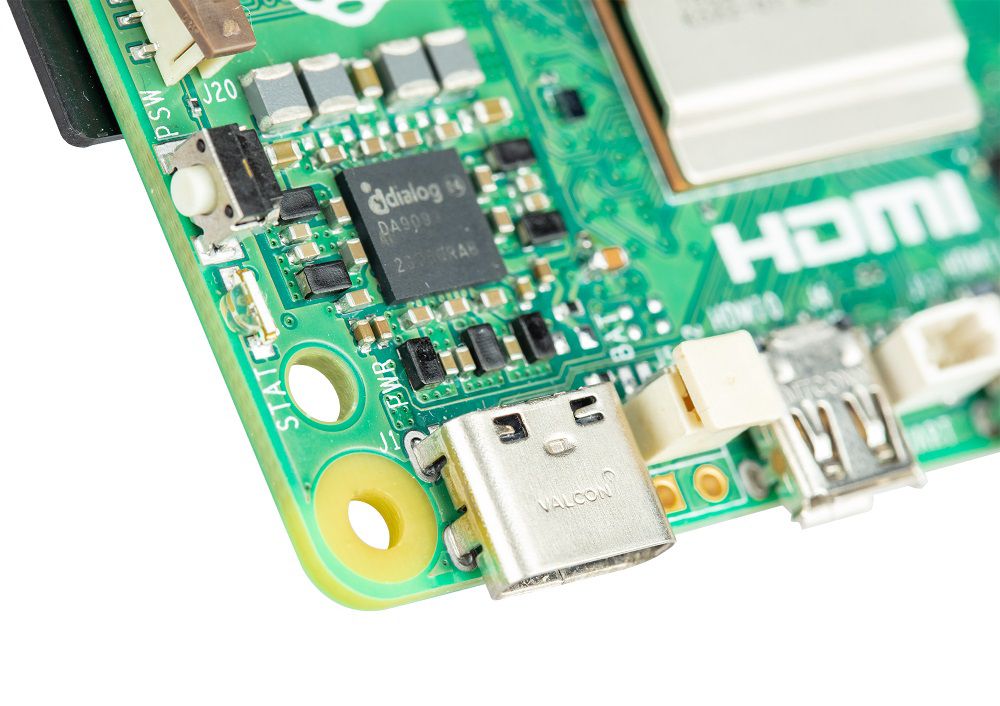
- Power Button: On/Off included
- USB Ports:
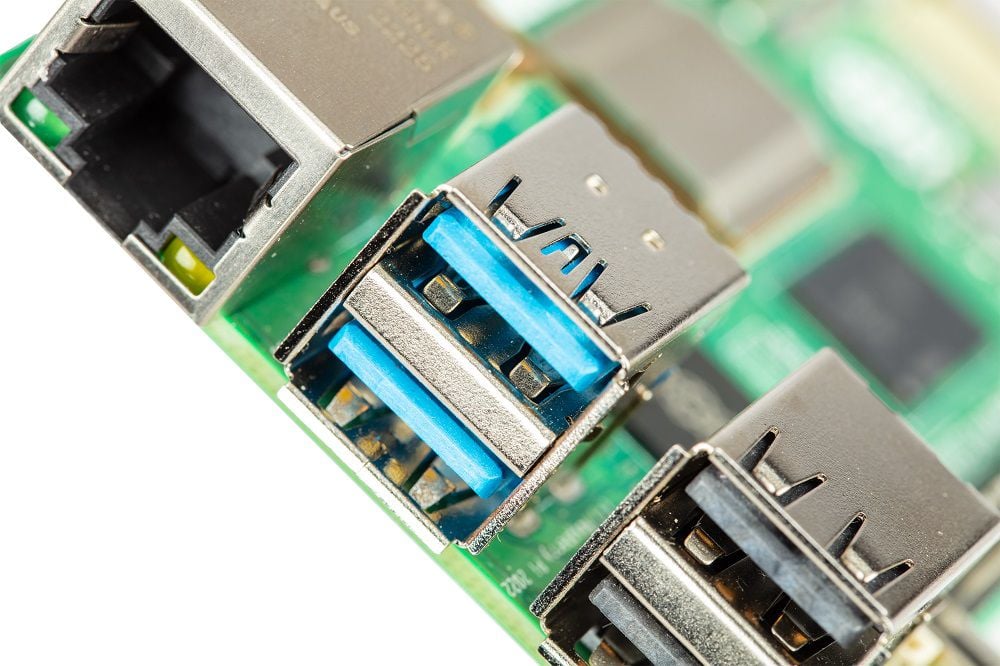
- 2 × USB 3.0 ports, supporting simultaneous 5Gbps operation
- 2 × USB 2.0 ports
- Ethernet: Gigabit Ethernet, with PoE+ support (requires separate PoE+ HAT)
- Camera/Display: 2 × 4-lane MIPI camera/display transceivers
- PCIe Interface: PCIe 2.0 x1 interface for fast peripherals (requires separate M.2 HAT or other adapter)
- Power: 5V/5A DC power via USB-C, with Power Delivery support
- Raspberry Pi Header: Raspberry Pi standard 40-pin header
- Real-time Clock (RTC): Powered from external battery
You can still use your previous accessories:
- micro HDMI to full-size (standard) HDMI cable.
- LCD Touch Screens - but needs new FPC cable.
- Pi Cameras - but needs new FPC cable
- Most of the HAT utilizes the 40-pin GPIO headers.
- USB devices such as keyboards, mice, and webcams.
- Ethernet Cable, those are quite standard too.
Need to get new accessories:
- Casing/ enclosure
- Cooling fan
- micro SD Card - Currently, Raspberry Pi 5 is only compatible with the new Raspberry Pi OS Bookworm. It will not be able to operate using any of the older versions of Raspberry Pi OS Bullseye. Get the a new MakerDisk microSD Card pre-loaded with Raspberry Pi OS Bookworm, which you can use out of the box!
Recommend to upgrade:
- 5V/ 5A PSU - You still can use your old 5V/ 3A USB-C PSU to boot Raspberry Pi 5, but for certain application, the power may not be sufficient. In order to get the best performance of your Raspberry Pi 5, we strongly encourage you to get the new 5V/ 5A PD PSU.
Raspberry Pi 5 Highlights
Faster CPU, GPU, and RAM
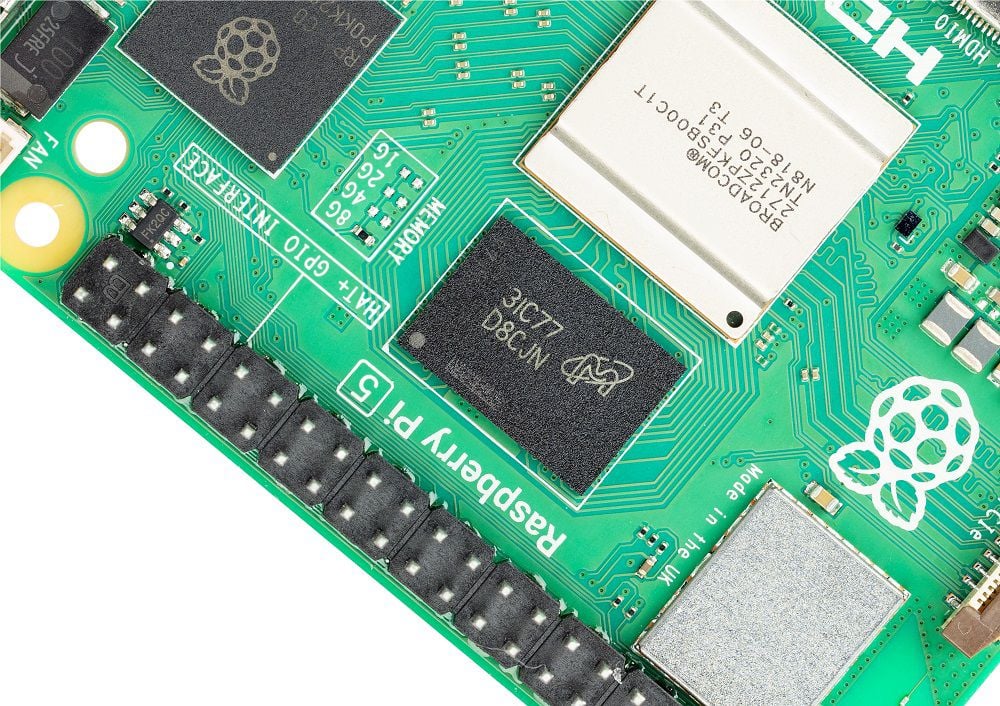
Equipped with ARM Cortex-A76 CPU clocked up to 2.4GHz, and VideoCore VII GPU. These increase the performance up to 2 to 3 times faster than Raspberry Pi 4 Model B! Raspberry Pi 5 could be your better option for your project that requires high-speed processing power like AI (Artificial Intelligence) programs, or intensive graphical rendering. Raspberry Pi 5 is designed to accommodate 8GB, 4GB, 2GB, or 1GB of LPDDR4X-4267 RAM options (However, only 8GB and 4GB RAM options are available during launch). It even has the RAM option indicator on the board, so you don’t have to think anymore about how much RAM your Raspberry Pi has!
Note: Only 8GB and 4GB variants will be available at the launch. The 2GB and 1GB variants may be released a year later.
Better USB 3.0
Can I use Raspberry Pi 4 Model B Accessories?
 You can still use your previous accessories:
- micro HDMI to full-size (standard) HDMI cable.
- LCD Touch Screens - but needs new FPC cable.
- Pi Cameras - but needs new FPC cable
- Most of the HAT utilizes the 40-pin GPIO headers.
- USB devices such as keyboards, mice, and webcams.
- Ethernet Cable, those are quite standard too.
Need to get new accessories:
- Casing/ enclosure
- Cooling fan
- micro SD Card - Currently, Raspberry Pi 5 is only compatible with the new Raspberry Pi OS Bookworm. It will not be able to operate using any of the older versions of Raspberry Pi OS Bullseye. Get the a new MakerDisk microSD Card pre-loaded with Raspberry Pi OS Bookworm, which you can use out of the box!
Recommend to upgrade:
- 5V/ 5A PSU - You still can use your old 5V/ 3A USB-C PSU to boot Raspberry Pi 5, but for certain application, the power may not be sufficient. In order to get the best performance of your Raspberry Pi 5, we strongly encourage you to get the new 5V/ 5A PD PSU.
How to Use
- 1. Preparation: SD card, card reader.
- 2. Download the system (Click here to download), Raspberry Pi 4 requires the latest system before using (as shown below):

- 3. Format the SD card: Insert the SD card into the PC with a card reader, and format the SD card through SDFormatter.exe. Click here to download SDFormatter.exe, and click to format the SD card.

- 4. Program the image: use Win32DiskImager.exe to burn the image. Select the image to be burned, and click "Write" to program, (click here to download Win32DiskImager.exe). After the programming is completed, you will be prompted whether you want to format, here you need to click Cancel.

- 5. Start RPI5: Insert the SD card after programming into the Raspberry Pi, and connect the adapter with the Type-C interface of 5V 5A to boot the Raspberry Pi. Normally, you can see that the Power light is always on red, and the ACT green light is flashing.
- 6. Connect peripherals such as an on-screen mouse and keyboard to start your Raspberry Pi journey.
UART Login
The Raspberry Pi 5 has a dedicated connector for debugging UART, supports a maximum baud rate of 921,600bps, and is configurable via EEPROM parameters. It is always active and enabled, and supports direct access to early boot and firmware information; as well as the Linux console after booting.

The UART connector has three pins.

RTC (Real-time Clock)
Hardware
The RTC is powered by adding a backup battery using the J5 (BAT) connector and will work without a connection as long as the PI5 is kept powered on. Optionally, you can purchase a dedicated RTC battery for the PI5.

Siftware Debug
- The default device is /dev/rtc0.
- As for the time, you can see the current time by typing "date" in the command line, connecting to the network Raspberry Pi system will automatically network timing, if the default RTC device has a connection and is working properly, then the RTC time will be updated after the automatic network timing
.
sudo hwclock -r for reading the RTC time, if there are many RTC devices, you can use "-f" to select the corresponding device (such as "sudo hwclock -f /dev/rtc1 -r").
Hwclock
System clock -> hardware clock (RTC)
sudo hwclock -w
Synchronize hardware clock (RTC) -> system clock
sudo hwclock -s
#You need to turn off the network, or turn off network timing, otherwise it will be changed back
Set hardware clock time (RTC):
sudo hwclock --set --date="9/8/2023 16:45:05"
View the hardware clock (RTC)
sudo hwclock -r
Display version information
sudo hwclock --verbose
Auto Wakeup
To support low-power mode for wake-up alerts, add the configuration:
sudo -E rpi-eeprom-config --edit
#Add the following two lines:
POWER_OFF_ON_HALT=1
WAKE_ON_GPIO=0
#You can use the following method to test the function:
echo +600 | sudo tee /sys/class/rtc/rtc0/wakealarm
sudo halt or sudo poweroff
#Will wake up and restart after 10 minutes
RTC Battery Charging
Note: Please check whether your RTC battery supports charging and the maximum input voltage before adding the following commands.
sudo nano /boot/firmware/config.txt
#Add
dtparam=rtc_bbat_vchg=3000000
#3000000 indicates the maximum voltage, charging to 3V will disable charging, and the voltage lower than 3V will start to trickle charging
Resource
FAQ
1. Input "xrandr" on the Raspberry Pi to view the HDMI-ID of the main display (most are HDMI-1):

2. Input command: "xinput" to view the touch ID of the main display (there are two touch IDs. If you do not know which one is for the main display, you can try them both.)

3.Run the command: xinput map-to-output <touch ID> <HDMI-ID>
(The ID value should be changed according to the actual ID checked. for example xinput map-to-output 7 HDMI-1 )
![]()
4. If you want to configure the touchscreen and save the setting, you have to set it to auto-start. sudo nano /etc/xdg/lxsession/LXDE-pi/autostart
Add the line: xinput map-to-output 7 HDMI-1
Note that You need to change the ID corresponding to yours and reboot Raspberry Pi.

วิธีการชำระเงิน
ชำระเงินค่าสินค้าโดยการโอนเงินเข้าบัญชีธนาคาร KBANK, SCB, BBL,TMB
กรุณาเก็บหลักฐานการโอนเงินของท่านไว้เพื่อแจ้งการชำระเงินด้วยค่ะ
ท่านสามารถแจ้งการชำระเงินผ่านระบบอัตโนมัติได้โดย Click Link ข้างล่างค่ะ
https://www.arduitronics.com/informpayment
ชำระเงินผ่านธนาคาร


@rfm0967y
ติดต่อสอบถาม
Join เป็นสมาชิกร้านค้า
MEMBER
