
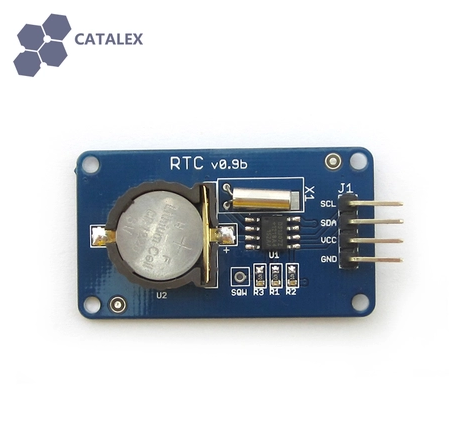
Real Time Clock (RTC) Module DS1307 by Catalex v1.1


| รหัสสินค้า | SG00077 |
| หมวดหมู่ | Clock and Timing |
| ราคา | 85.00 บาท |
| สถานะสินค้า | พร้อมส่ง |
| จำนวน | ชิ้น |

รายละเอียดสินค้า
Real Time Clock Module - Catalex (DS1307)
อัพเดทตัวสินค้าล่าสุดเป็นเวอร์ชั่น 1.1 นะค่ะ
RTC ตัวนี้เป็นของเกรด A จาก Catalex ครับ สร้างสัญญาณแสดงเวลาโดยใช้ DS1307 สามารถ download library และการต่อใช้งานได้ที่
http://pan.baidu.com/share/link?shareid=1570527979&uk=1966479381
Description:
The module is based on the DS1307 high-precision real-time clock module, through the I2C interface to communicate with the microcontroller, can be read in real time the year, month, date, day, hour, minute, second. When buckle button batteries, even though the module is powered down, the clock will continue to chip timing.
Module features are as follows:
Can be timed to 2100
Control interface for the I2C interface
5VDC power supply recommendations
DS1307 address of the module is 0x68
Level control interface for 5V or 3.3V
4 M2 screws positioning holes for easy installation
Specification:
|
Project |
Min |
Typical values |
Max |
Unit |
|
Supply volt (Vcc) |
4.5 |
5 |
5.5 |
V |
|
Battery voltage |
2.0 |
3.0 |
3.5 |
V |
|
High input |
2.2 |
- |
VCC +0.3 |
V |
|
Low-level input |
-0.3 |
- |
+0.8 |
V |
|
Size |
42X24X12 |
mm |
||
|
Weight |
6 |
g |
||
Interfaces:
Control Interface : A total of four pins (GND, VCC, SDA, SCL), GND to ground, VCC is the power supply, SDA I2C interface for the data lines, SCL of I2C interface clock line;
Real-time clock IC : DS1307Z, independent timing, communication with the MCU via the I2C interface;
Battery Holder : CR1220 battery holder, with the board presented the transposon inserted in the battery to allow continuous real-time clock chip timing.
Positioning holes : 4 M2 screws positioning hole diameter is 2.2mm, the positioning of the module is easy to install, to achieve inter-module combination
Experimental equipment :
An Arduino-compatible motherboard Catduino (not familiar with open source hardware can be understood as Atmega328P microcontroller development board) and a mini USB cable;
A real-time clock module;
4 Male to Female Dupont line for control interface and Catduino development board connected to the module;
Experimental procedure :
1 with 4 Male to Female DuPont line real-time clock module and Catduino I2C interface to link up and make sure the battery has been installed on the module securely in the following table, shown in Figure
|
Catduino |
Cable |
Real-time clock module |
|
GND |
Black line |
GND |
|
5V |
Red |
VCC |
|
A4 (SDA) |
Yellow Line |
SDA |
|
A5 (SCL) |
White line |
SCL
|
1) From Baidu network disk http://pan.baidu.com/share/link?shareid=1570527979&uk=1966479381 download the module Arduino1.0 version of the above applies to packages RTCforArduino1.0 +, then unzip it directly to .. \ arduino-1.0 \ libraries directory.
2) with a mini USB to connect the Catduino, if it is the first use of the board, its USB to serial driver can find the USB Drivers from drivers Arduino IDE directory.
3) Re-open Arduino IDE, click the Open button on the toolbar to open the SetTimeAndDisplay RTC routines, as shown below.

Seleced serial port, board name, click on the Burn button to burn. The routine shows you how to set the time, read time from the DS1307 and display to the display window serial tool, as shown below

Serial terminal can be found printed every minute, day of the year and the week.
วิธีการชำระเงิน
ชำระเงินค่าสินค้าโดยการโอนเงินเข้าบัญชีธนาคาร KBANK, SCB, BBL,TMB
กรุณาเก็บหลักฐานการโอนเงินของท่านไว้เพื่อแจ้งการชำระเงินด้วยค่ะ
ท่านสามารถแจ้งการชำระเงินผ่านระบบอัตโนมัติได้โดย Click Link ข้างล่างค่ะ
https://www.arduitronics.com/informpayment
ชำระเงินผ่านธนาคาร


@rfm0967y
ติดต่อสอบถาม
Join เป็นสมาชิกร้านค้า
MEMBER
