
FireBeetle 2 ESP32-C5 IoT Development Board (2.4 / 5GHz Wi-Fi 6, Solar Charging, Home Assistant) - แท้ DFRobot
| รหัสสินค้า | BA00317 |
| หมวดหมู่ | WiFi ESP32-C5 |
| ราคา | 485.00 บาท |
| สถานะสินค้า | พร้อมส่ง |
| จำนวน | ชิ้น |

รายละเอียดสินค้า
Introduction
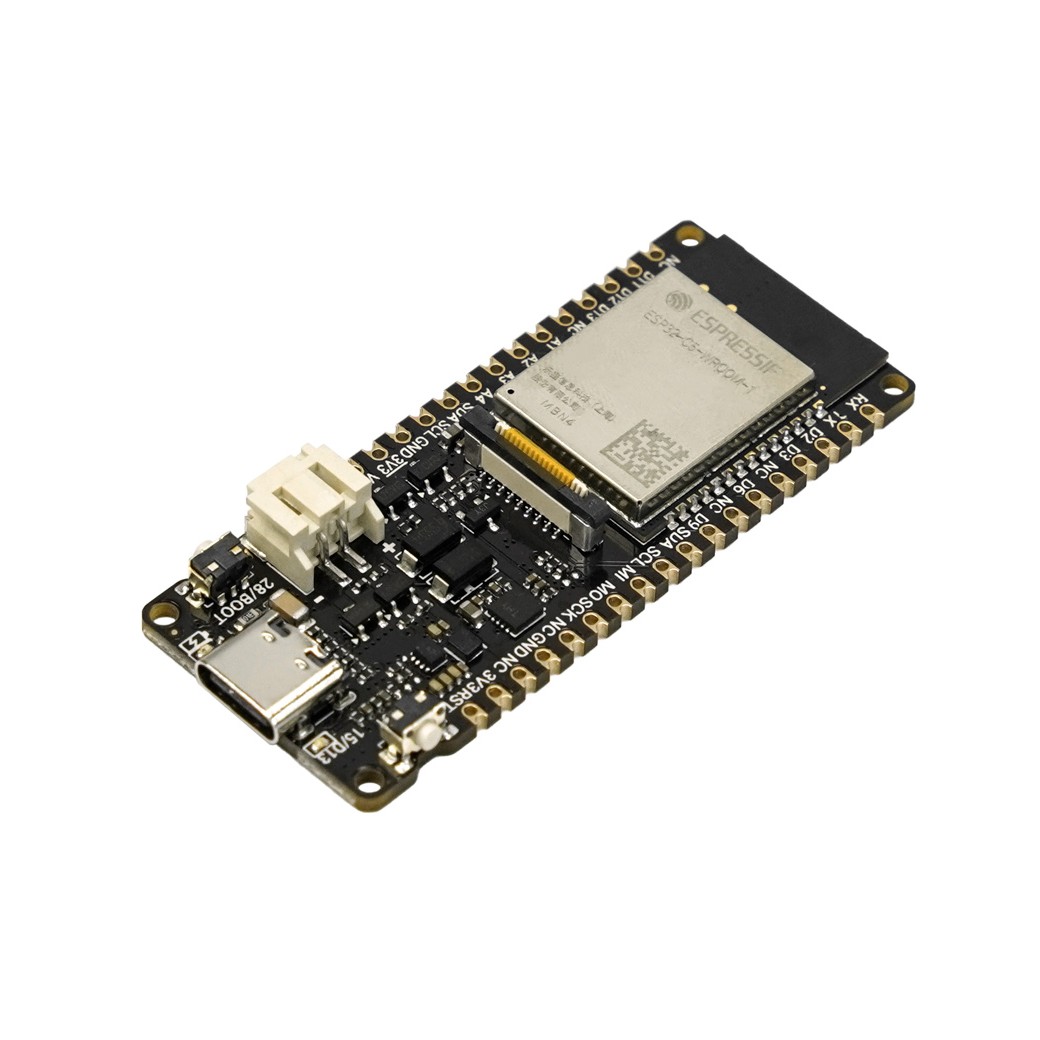
The FireBeetle 2 ESP32-C5 is a high-performance, low-power IoT development board designed for advanced smart home and extensive IoT applications. Its core strength lies in the groundbreaking Espressif ESP32-C5 chip, offering dual-band (2.4 & 5 GHz) Wi-Fi 6 for enhanced wireless performance, comprehensive multi-protocol support (BLE, Zigbee, Thread), and an advanced power management system with built-in solar charging. Powered by a 240 MHz RISC-V processor with 384 KB SRAM and 4 MB Flash, it achieves an ultra-low deep-sleep current of only 21 μA.

Superior Wireless Performance with Dual-Band Wi-Fi 6
Dual-band Wi-Fi 6 provides higher throughput, lower latency, and more stable connectivity, especially for:
-
- High-Throughput Streaming: HD video, FPV drones, edge servers
- Low-Latency Control: Robotics, automation, real-time systems
Wi-Fi 6 features such as OFDMA and TWT improve multi-device efficiency and extend battery life.

Flexible Power, Endless Deployment
Designed for reliable long-term operation in indoor and outdoor environments.
-
- Multiple Power Inputs: Type-C, 5V DC, PH2.0 Li-ion battery
- Integrated Solar Charging: Supports 4.5–6V solar panels
- Ultra-Low Power Mode: Deep-sleep current only 21 μA
Unified Wireless Hub for Modern IoT
Beyond Wi-Fi, the FireBeetle 2 ESP32-C5 acts as a multi-protocol IoT gateway.
-
- Matter-Ready: Create devices compatible with Apple Home and Google Home
- Gateway Capability: Works as Wi-Fi MQTT client, Zigbee device, or Thread node
Rapid Prototyping with the FireBeetle Ecosystem
-
- Onboard GDI: Plug-and-play display connection
- PH2.0 Battery Interface: Safe and reliable for portable projects
- Compatible with Gravity & Fermion sensors
- Supports Arduino (C/C++) and MicroPython
Applications
-
- Solar-powered balcony soil monitoring
- Indoor air quality monitoring
- Smart Home: Zigbee ↔ Wi-Fi bridge
- Robotics / FPV: low-latency streaming
Specification
Basic Parameters
-
- Operating Voltage: 3.3V
- Type-C Input: 5V DC
- VIN Input: 5V DC or 4.5–6V solar
- Max Charging Current: 0.5A
- Deep Sleep Current: 21 μA
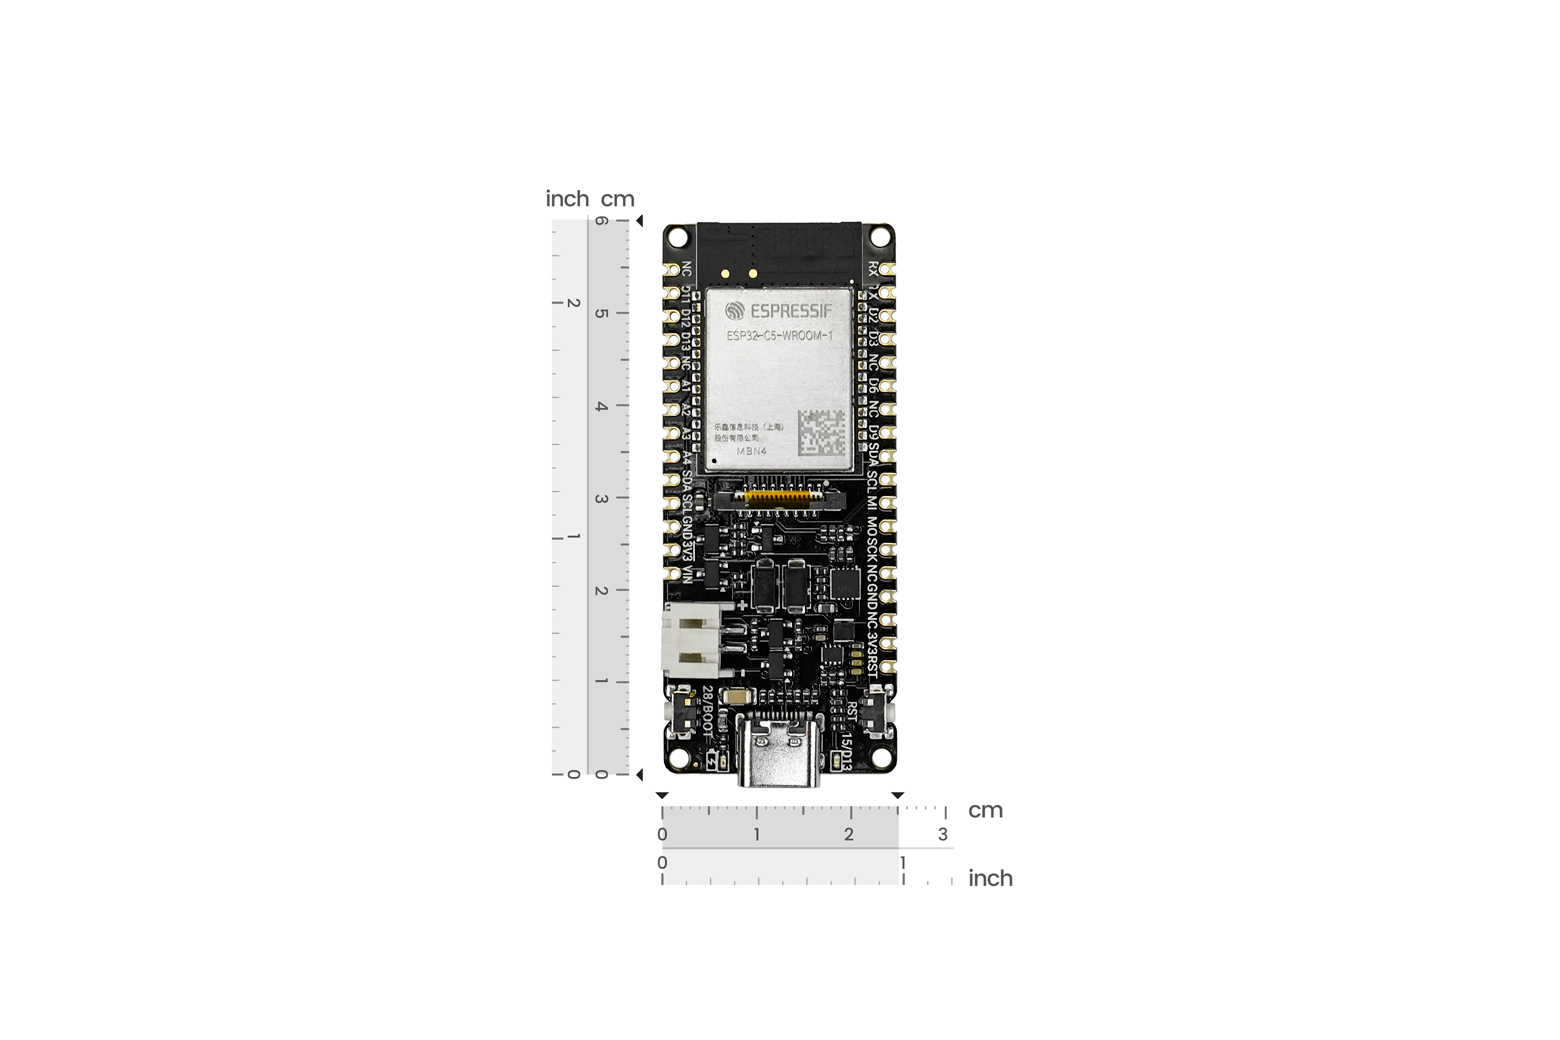
- Size: 25.4 × 60 mm
Hardware Information
-
- RISC-V single-core, 240 MHz
- SRAM: 384 KB
- ROM: 320 KB
- Flash: 4 MB
Wi-Fi
-
- Dual-band 2.4/5 GHz
- 802.11 a/b/g/n/ac/ax
Bluetooth
-
- Bluetooth 5 + Mesh
- 125 kbps – 2 Mbps
IEEE 802.15.4
-
- Thread 1.3 / Zigbee 3.0
- 2.4 GHz band
- 250 kbps
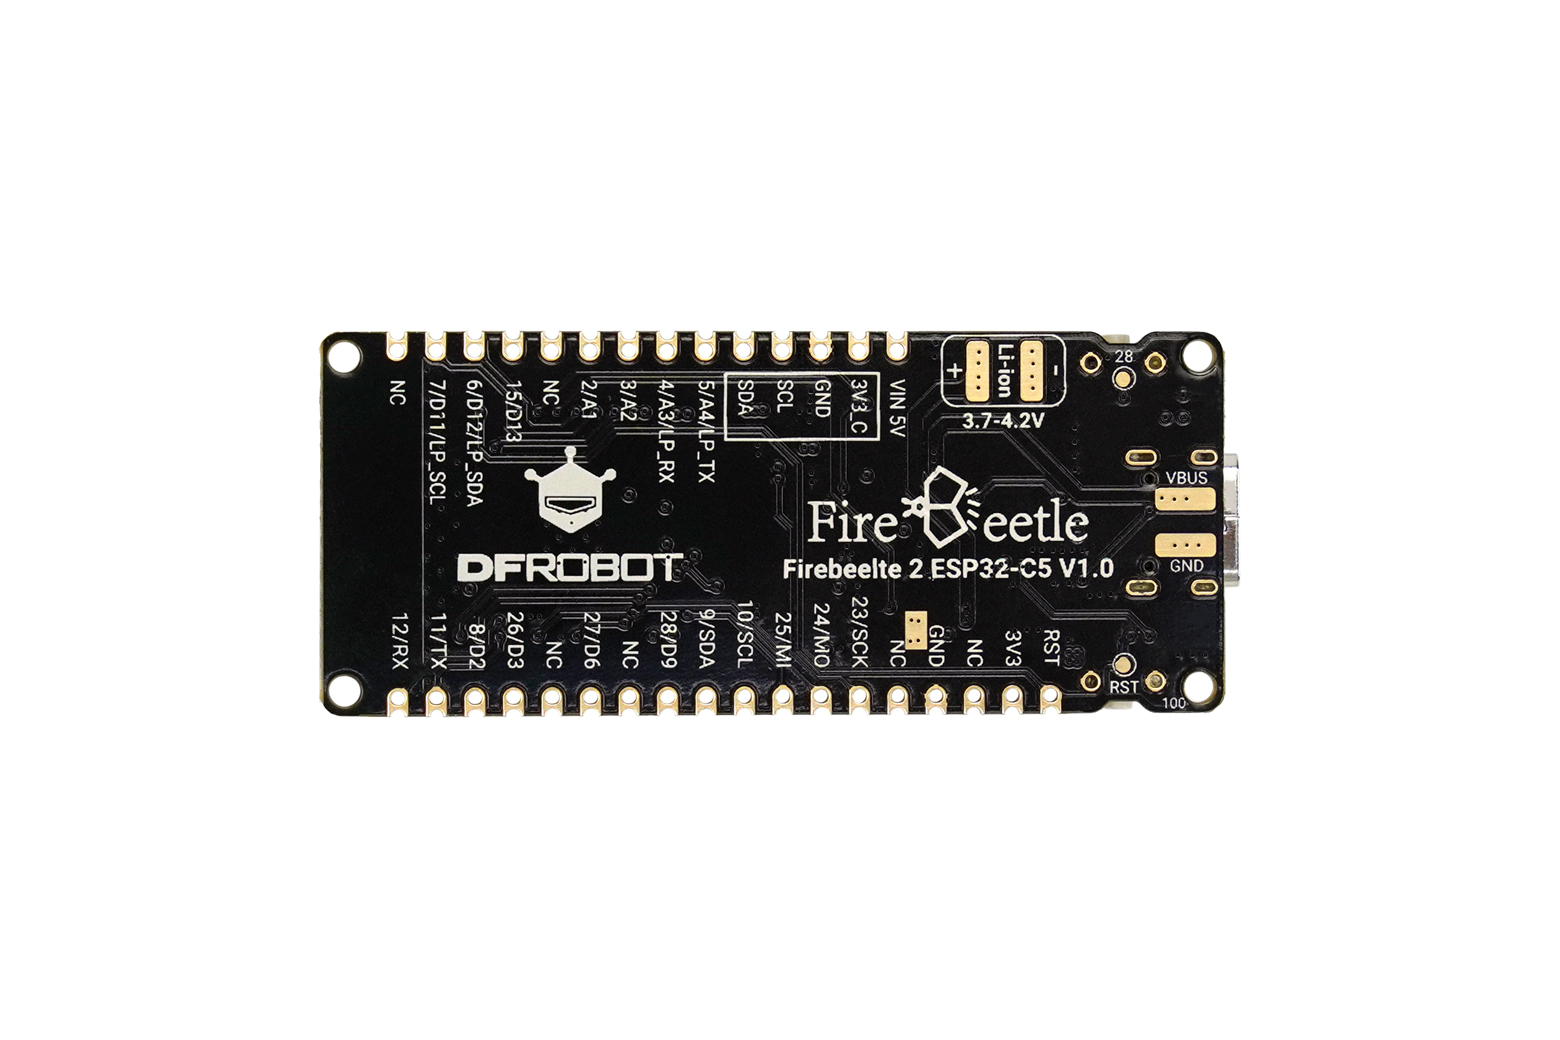
Interface Pins
-
- Digital I/O ×18
- LED PWM ×6
- SPI ×1
- UART ×3
- I2C ×2
- I2S ×1
- 12-bit ADC (7 channels)
Documents
Shipping List
-
- FireBeetle 2 ESP32-C5 Board ×1
- 20-pin 2.54mm Header ×2
3. First Use
3.1 Adding the Board
Please click the link below to view the detailed steps for adding the board:
https://wiki.dfrobot.com.cn/Add_ESP32_board_to_Arduino_IDE
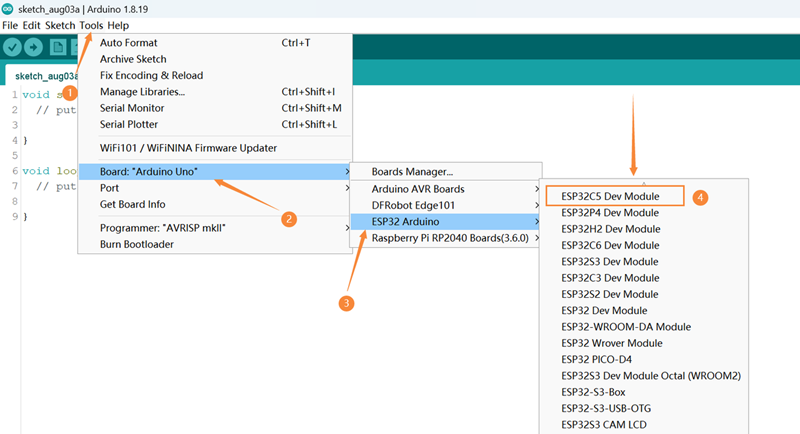
3.2 Selecting the Development Board and Serial Port
After the ESP32 board is installed, the next step is to select the SDK corresponding to Firebeetle 2 ESP32-C5.
-
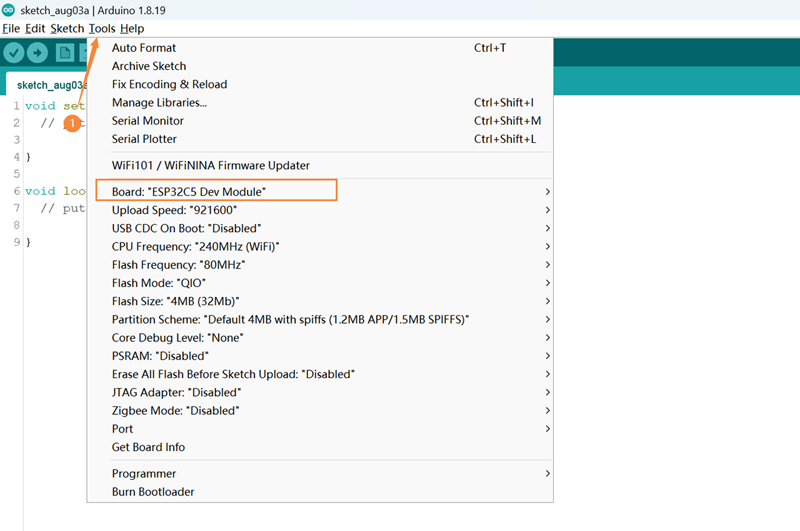
Open Tools -> Board: -> ESP32 Arduino to see the list of development boards, as shown in the figure below, select ESP32C5 Dev Module.

-
Open Tools again, and you can see Board: "ESP32C5 Dev Module".

-
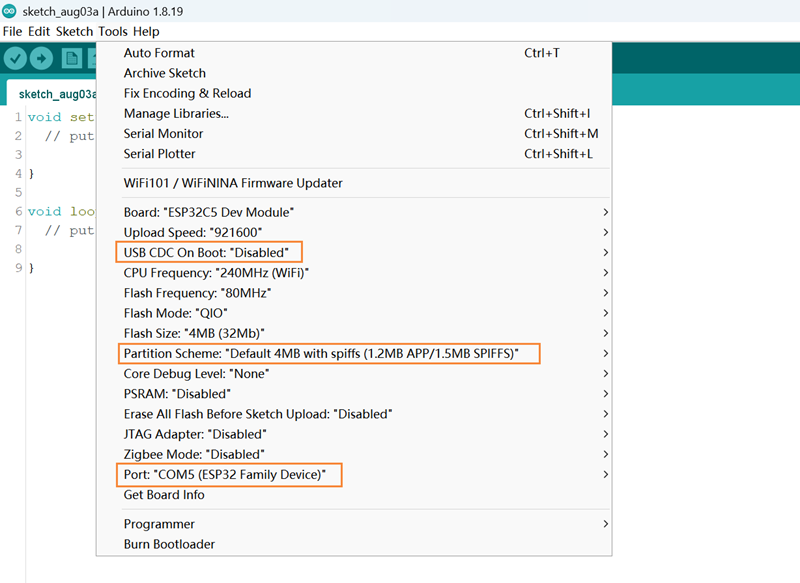
Connect the Firebeetle 2 ESP32-C5 development board to the computer. Before burning the code, you need to configure the following information for the Firebeetle 2 ESP32-C5 development board:
-
USB CDC On Boot:
- Enabled: Print serial data through the USB interface
- Disable: Print serial data through TX and RX
-
Partition Scheme: Disk partition scheme, please select the appropriate storage space according to the development board's Flash
-
Port: Development board port (the COM number is correct, regardless of the chip model later)

-
3.3 Downloading Code
- Copy the code into the window and click "Upload" to upload the code
- Wait for the burning to complete, and you can see the on-board LED light change from blinking to steady on.
If burning fails and the LED still blinks, please check [Frequently Asked Questions].
4. ESP32 General Tutorial
Please click the link below to view the detailed ESP32 general tutorial:
https://wiki.dfrobot.com.cn/ESP32_General_Tutorial?heisgoodman
5. ESP-IDF Tutorial
Please click the link below to view the detailed ESP32-C5 ESP-IDF tutorial:
https://docs.espressif.com/projects/esp-idf/zh_CN/latest/esp32c5/get-started/index.html
6. MicroPython Tutorial
Please click the link below to view the detailed MicroPython tutorial:
https://wiki.dfrobot.com.cn/ESP32_MicroPython_Usage_Tutorial
7. Platform IO Tutorial
Please click the link below to view the detailed MicroPython tutorial:
https://wiki.dfrobot.com.cn/ESP32_Platform_IO
8. FLASH Download Tool Usage Tutorial
Please click the link below to view the detailed FLASH download tool usage tutorial:
https://wiki.dfrobot.com.cn/FLASH_Download_Tool_Usage_Tutorial
9. Data Download
- ESP32-C5 datesheet(V1.0)
- DFR1222- V1.0 schematic
- DFR1222-V1.0-2D File
- DFR1222-V1.0-3D File
- CN3165.pdf
10. Frequently Asked Questions
- No ESP32-C5 development board in Arduino IDE
Solutions:
- Please download the latest board environment
- Environment version chip support status
- Stable version: https://espressif.github.io/arduino-esp32/package_esp32_index.json
- Development version: https://espressif.github.io/arduino-esp32/package_esp32_dev_index.json
- Burning error
Reasons:
- If the delay in Loop is too short or no delay is added, it will cause burning timeout

- Incorrectly calling some functions can cause the computer to fail to recognize the USB.
Solution:
Press and hold BOOT, click RST, and then release the BOOT button to perform the burning.
Principle:
When ESP32 starts, it will detect the level of the BOOT (IO28) pin. If the level is high, it will start normally; if the level is low, it will enter the burning mode. The default level of the BOOT pin is high, and when the button is pressed, the level is low.
- No printout on the serial port
Solution:
Check whether the USB CDC is in the Enable state.
Use other serial port debugging assistants to view the printout information.
For more questions and interesting applications, you can visit the forum to look up information or post threads.
วิธีการชำระเงิน
ชำระเงินค่าสินค้าโดยการโอนเงินเข้าบัญชีธนาคาร KBANK, SCB, BBL,TMB
กรุณาเก็บหลักฐานการโอนเงินของท่านไว้เพื่อแจ้งการชำระเงินด้วยค่ะ
ท่านสามารถแจ้งการชำระเงินผ่านระบบอัตโนมัติได้โดย Click Link ข้างล่างค่ะ
https://www.arduitronics.com/informpayment
ชำระเงินผ่านธนาคาร


@rfm0967y
ติดต่อสอบถาม
Join เป็นสมาชิกร้านค้า
MEMBER
