
Gravity: MAX30102 PPG Heart Rate and Oximeter Sensor (I2C/UART) (ของแท้จาก DFRobot)

| รหัสสินค้า | AS00612 |
| หมวดหมู่ | โมดูลเซ็นเซอร์ทางชีวภาพ Biometrics Sensor |
| ราคา | 1,385.00 บาท |
| สถานะสินค้า | พร้อมส่ง |
| จำนวน | ชิ้น |

รายละเอียดสินค้า
ดูรายละเอียดเพิ่มเติมการใช้งานและตัวอย่าง code ได้ที่
Introduction:
Note:
- The pressure may change when the finger is directly pressed down the sensor, which will affect the data output. So please try to fix the sensor on your finger.
- Wear the sensor on your finger and there is no difference in the direction of wearing.
- This product is not a professional medical instrument and should not be used as an auxiliary accessory in diagnosis and treatment

Wear Instructions

Connect with DFRduino UNO R3

Connect with Raspberry Pi
Features:
- Microcontroller with algorithm integrated
- Data can be read directly through the host computer
Specification:
- Power Supply Voltage: 3.3V/5V
- Working Current: <15mA
- Communication Method: I2C/UART
- I2C Address: 0x57
- Serial Port Baud Rate: 9600
- Operating Temperature Range: -40℃~85℃
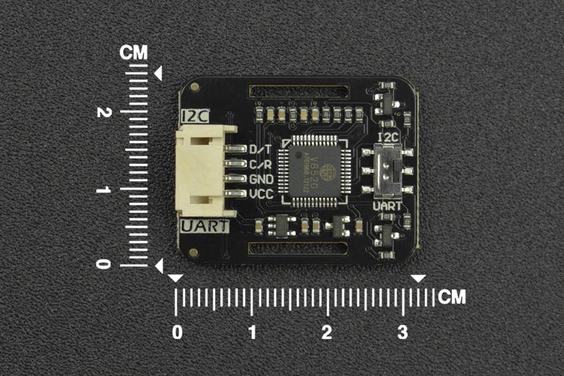
- Product Size: 25.5×32mm/0.98×1.26inch
- Heart rate blood oxygen project
- Home heart rate oximeter
- Long-term heart rate and blood oxygen monitoring project
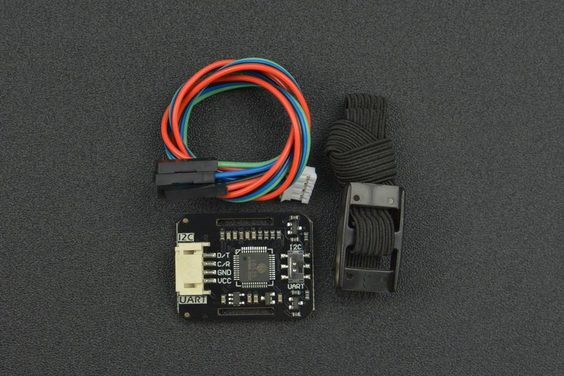
- Gravity: MAX30102 Heart Rate and Oximeter Sensor x1
- Gravity-4P I2C/UART Sensor Connector x1
- Strap x1
Wear Instructions

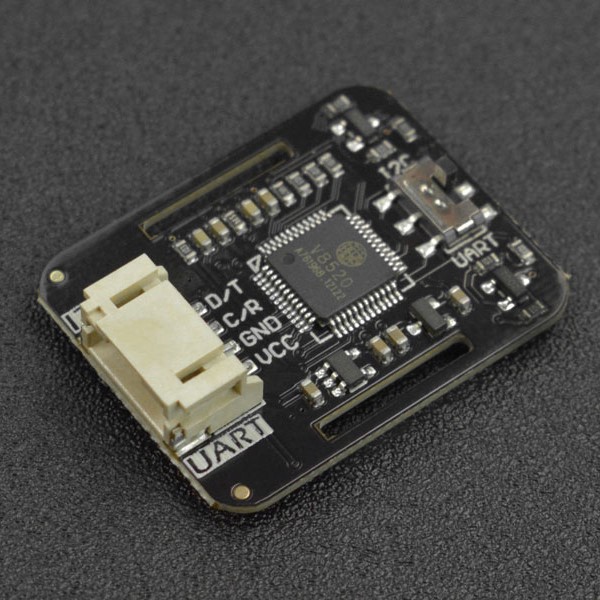
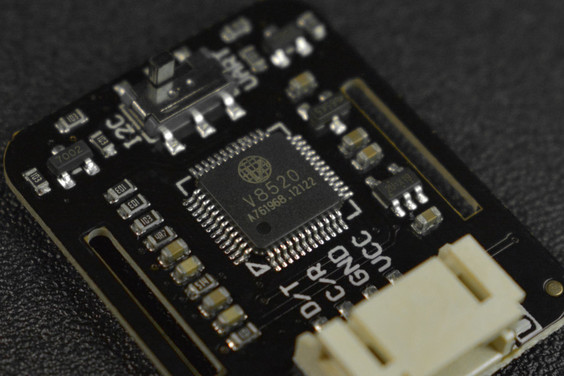
Board Overview

| Num | Label | Description |
|---|---|---|
| 1 | D/T | I2C Data Line/TX |
| 2 | C/T | I2C Clock Line/RX |
| 3 | GND | Power - |
| 4 | VCC | Power + |
Tutorial
Requirements
-
Hardware
-
Arduino UNO R3 (or similar) x 1
-
Gravity: MAX30102 heart rate blood oxygen sensor x1
-
Dupont wires
-
-
Software
-
Download and install the Heart Rate Sensor Library and Sample Codes Library (About how to install the library?)
Note: RTU library is the modbus library transplanted for Arduino based on Modbus RTU protocol. Install the RTU library before use.
Connection Diagram

Sample Code 1 - Get the Heart Rate and Blood Oxygen Data
Obtain the heart rate blood oxygen value, start measuring the heart rate when the sensor's red light is on, the heart rate data is updated every 4 seconds, the sensor data can still be obtained within 4 seconds, but the data obtained during the data update period does not change.
Please pay attention to the position of the communication switch.
Expected Results

API Function
/*!
* @brief Get heart rate and oxygen saturation and store them into the structure sHeartbeatSPO2
* @param NULL
* @return No value returned
*/
void getHeartbeatSPO2();

/*!
* @brief Get the sensor board temp
* @param NULL
* @return Temp (unit: ℃)
*/
float getTemperature_C();

/*!
* @brief Sensor starts to collect data
* @param NULL
* @return NULL
*/
void sensorStartCollect();

/*!
* @brief Sensor stops collecting data
* @param NULL
* @return NULL
*/
void sensorEndCollect();
Tutorial for Raspberry Pi
Requirements
- Hardware
- Raspberry Pi 4B (or similar) x1
- Heart Rate and Oximeter Sensor V2 module (compatible with Raspberry Pi) x1
- Wires
Connection Diagram
- Connect the module to Raspberry Pi according to the connection diagram. The default I2C address is 0x68.

Driver Installation
- Enable the I2C interface of Raspberry Pi, if enabled, skip this step. Open terminal, type the following command, and press Enter:
pi@raspberrypi:~ $ sudo raspi-config
Select "5 Interfacing Options" and press Enter. Select "P5 I2C" and press Enter to confirm "YES". Restart the Raspberry Pi master control.
- Install Python dependencies with git, and Raspberry Pi needs to be connected to the Internet. If done, skip this step. In the terminal, type the following commands and press Enter:
pi@raspberrypi:~ $ sudo apt-get update
pi@raspberrypi:~ $ sudo apt-get install build-essential python-dev python-smbus git
- Download the BloodOxygen driver libraries. In the terminal, type the following commands and press Enter:
pi@raspberrypi:~ $ cd Desktop/ pi@raspberrypi:~/Desktop $ git clonehttps://github.com/DFRobot/DFRobot_BloodOxygen_S
Sample Code 1 - Get the Heart Rate and Blood Oxygen Data (gain_heartbeat_SPO2.py)
- In the terminal, type the following command and press Enter to run the sample code:
pi@raspberrypi:~/Desktop $ cd DFRobot_BloodOxygen_S/python/raspberry/example/gain_heartbeat_SPO2/
pi@raspberrypi:~/Desktop/DFRobot_BloodOxygen_S/python/raspberry/example/gain_heartbeat_SPO2/ $ python gain_heartbeat_SPO2.py
- Result

Use Guide for the Master Computer
Connect the sensor to the USB-to-serial port module.

Click to download the master computer of Heart Rate and Oximeter Sensor.
After decompressing, run SEN0344.exe, select the serial port and baud rate and click to start the measurement.

Modbus RTU Protocols
Note: The communication interface uses UART
| Transmit | From A device to B device | ||||
|---|---|---|---|---|---|
| Functions | B device Addess | Function Code | Register Address | Register Number | CRC Check |
| Get the Heart Rate and Blood Oxygen Data | 0×20 | 0×03/Read | 0×00 0×06 | 0×00 0×04 | CRC_h CRC_l |
| Get the Temperature | 0×20 | 0×03 | 0×00 0×0A | 0×00 0×01 | CRC_h CRC_l |
| Receive | Response from B device | ||||
| Functions | Bdevice Addess | Function Code | Valid Bytes | Data | CRC Check |
| Get the Heart Rate and Blood Oxygen Data | 0×20 | 0×03 | 0×08 | SPO2(1byte) xx(1byte reseved) Heartbeat(4byte) xx(2byte reserved) | CRC_h CRC_l |
| Get the Temperature | 0×20 | 0×03 | 0×02 | Temp_h Temp_l | CRC_h CRC_l |
| Set the Sensor | Transmit From A device | ||||
|---|---|---|---|---|---|
| Functions | B device Addess | Function Code | Register Address | Register Number | CRC Check |
| Start to Collet Data | 0×20 | 0×06 | 0×00 0×10 | 0×00 0×01 | CRC_h CRC_l |
| Stop Colleting Data | 0×20 | 0×06 | 0×00 0×10 | 0×00 0×02 | CRC_h CRC_l |
| Set the Sensor | Response From B device | ||||
| Functions | B device Addess | Function Code | Valid Bytes | Data | CRC Check |
| Start to Collet Data | 0×20 | 0×06 | 0×00 0×10 | 0×00 0×01 | CRC_h CRC_l |
| Stop Colleting Data | 0×20 | 0×06 | 0×00 0×10 | 0×00 0×02 | CRC_h CRC_l |
CRC check
วิธีการชำระเงิน
ชำระเงินค่าสินค้าโดยการโอนเงินเข้าบัญชีธนาคาร KBANK, SCB, BBL,TMB
กรุณาเก็บหลักฐานการโอนเงินของท่านไว้เพื่อแจ้งการชำระเงินด้วยค่ะ
ท่านสามารถแจ้งการชำระเงินผ่านระบบอัตโนมัติได้โดย Click Link ข้างล่างค่ะ
https://www.arduitronics.com/informpayment
ชำระเงินผ่านธนาคาร


@rfm0967y
ติดต่อสอบถาม
Join เป็นสมาชิกร้านค้า
MEMBER
